


Useful guides for merchants
We’re always here to help you! Get solutions that suit you best!
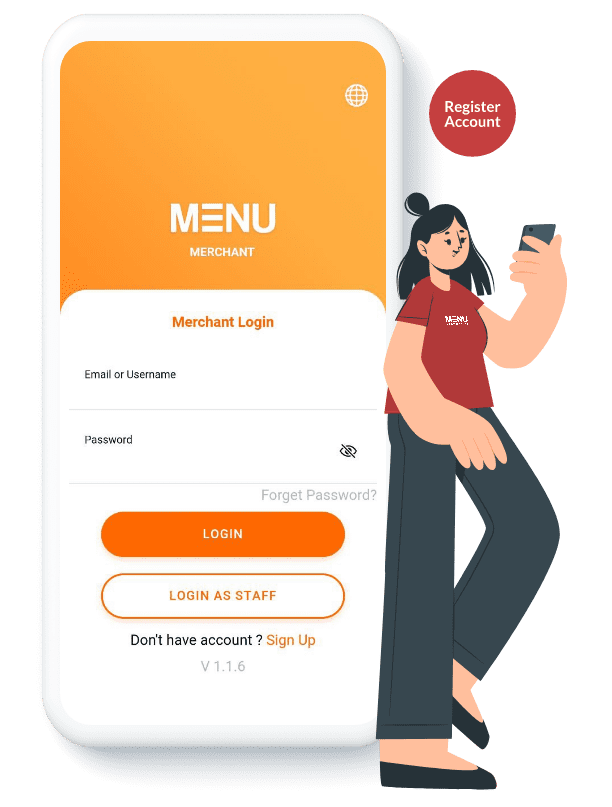
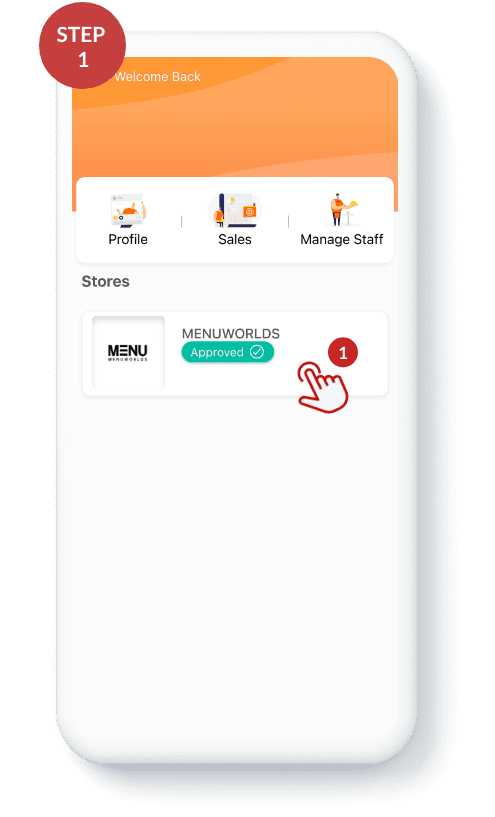
Register Account
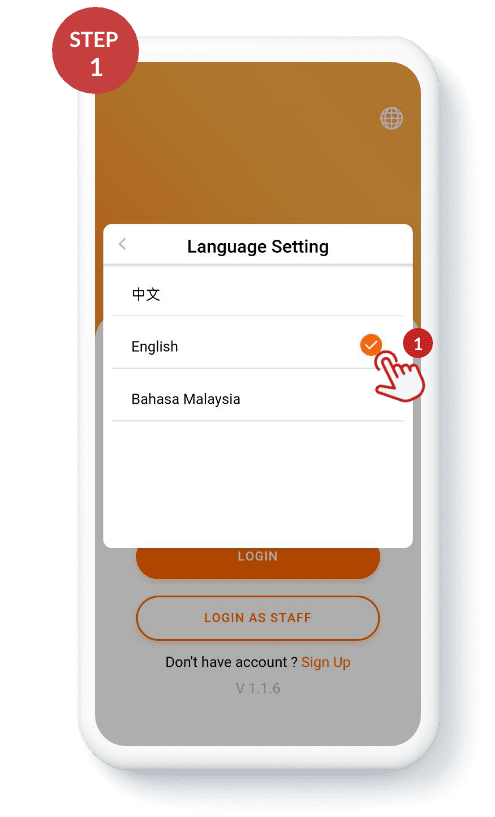
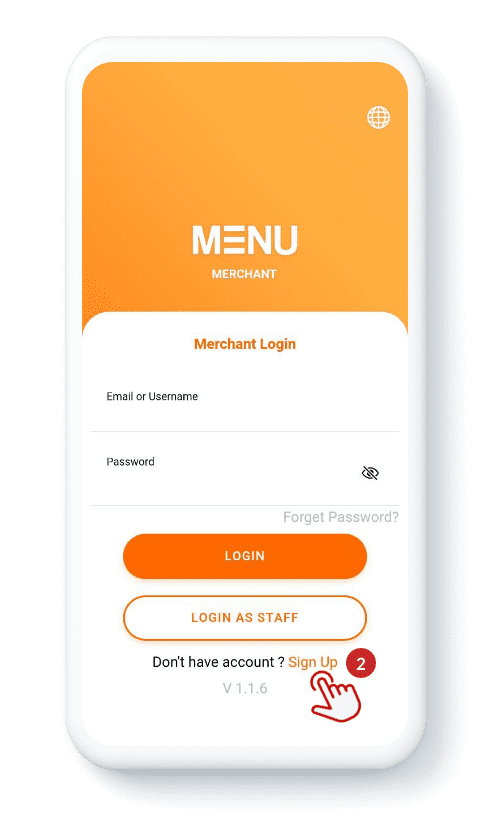
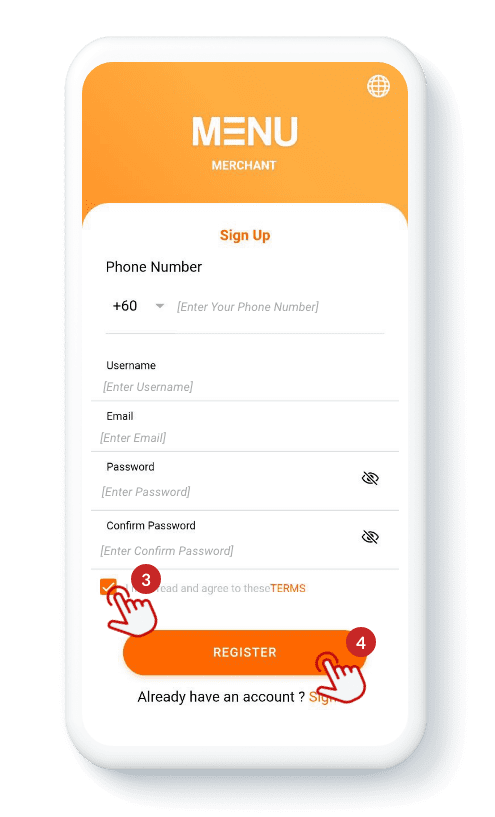
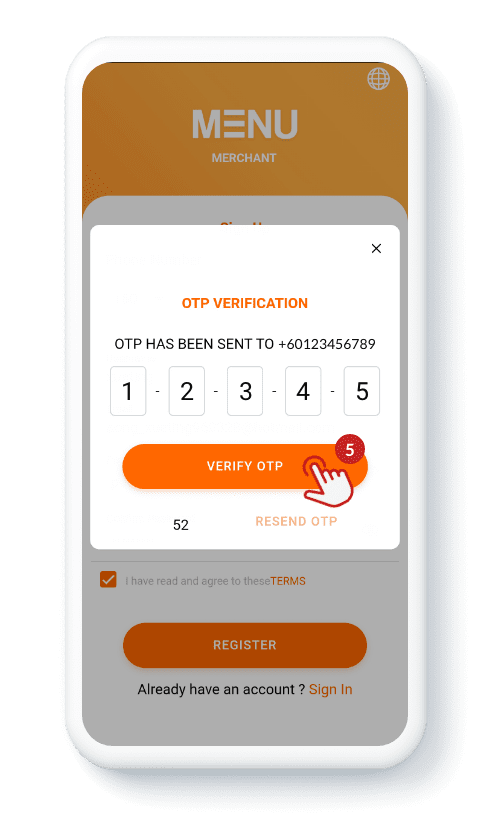
Open the MENUWORLDS Merchant App and select “Your Preferred Language” (1). Click “Register”(2) and fill in the required fields (your phone number, username, email, password and confirm your password). Click the “Box” (3) to agree with the Terms and Conditions before pressing “Register”(4). We will then send an OTP to your mobile number, please enter the 6 digits sent to your mobile number and press “Verify OTP”(5).
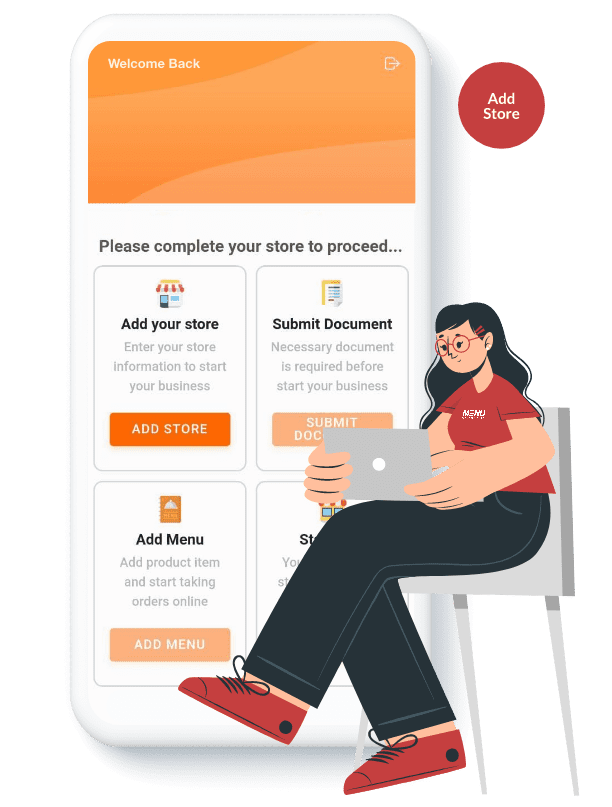
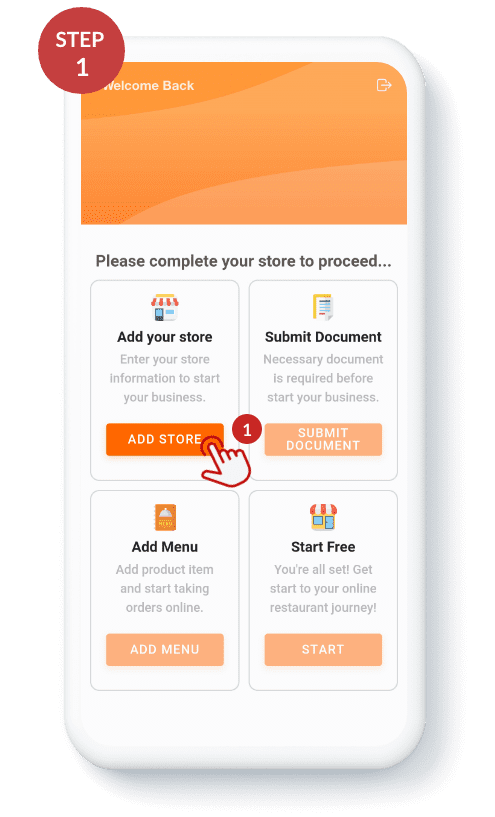
Add Store
Step 1: Press “Add Store” (1) and press * “When using the app” (2) to allow MENUWORLDS merchants access to your device location, which will automatically fill in your store address, latitude, and longitude.
*Suggestion: Please allow your location to be set in your store, which will be based on your shipping location. If you are not in your store or somewhere, don’t worry, it can be replaced later in the MENUWORLDS settings.
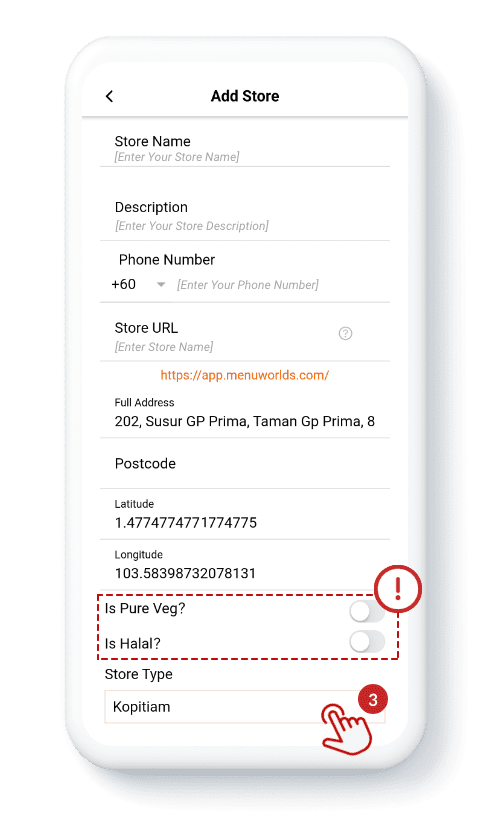
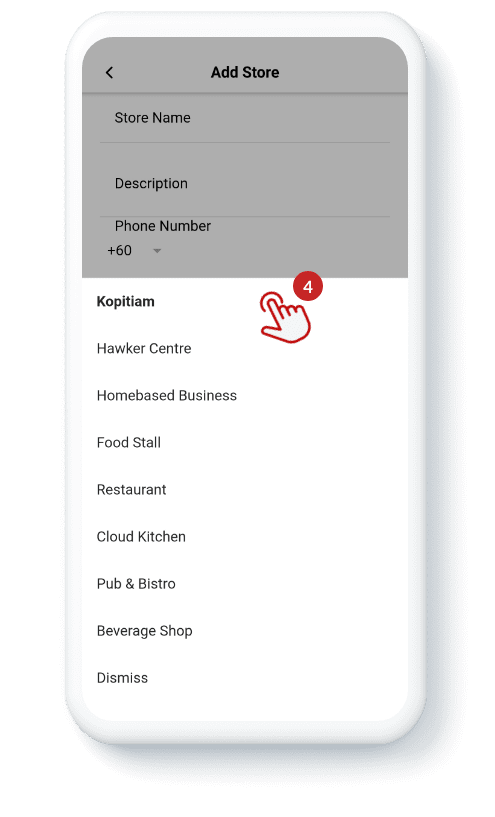
Step 2: Fill in the required fields (your store name, store description, phone number, store URL name, zip code, whether it is vegan or halal, and click on “Store Type” (3) and select “Your Store Type” (4).
*Is vegan and halal: you can choose according to your store, if you don’t need it, you can ignore it.
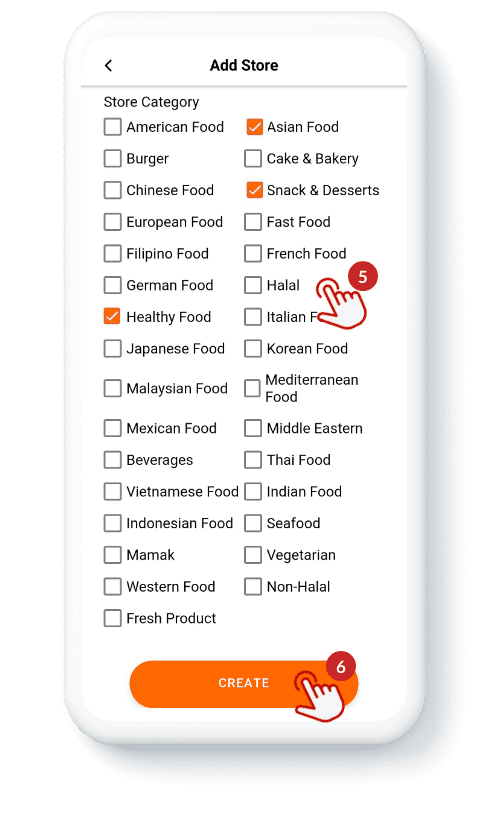
Step 3: Select your “Store Category” (5) and press “Create” (6).

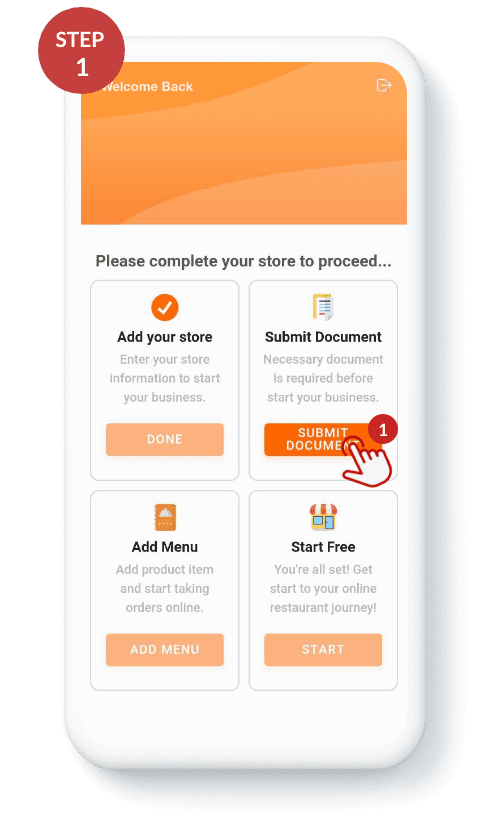


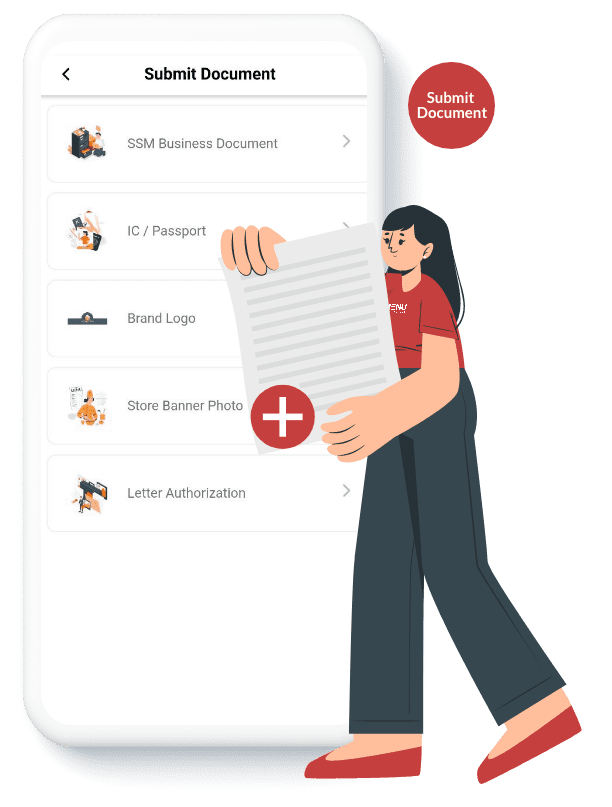
Submit Document
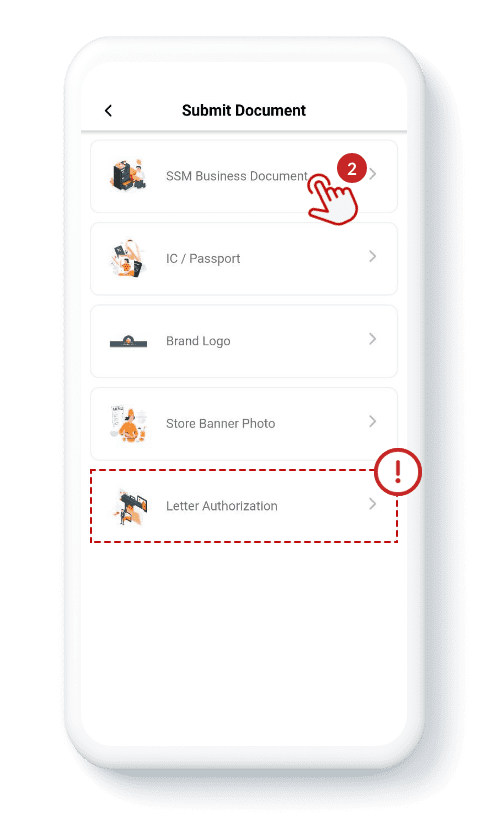
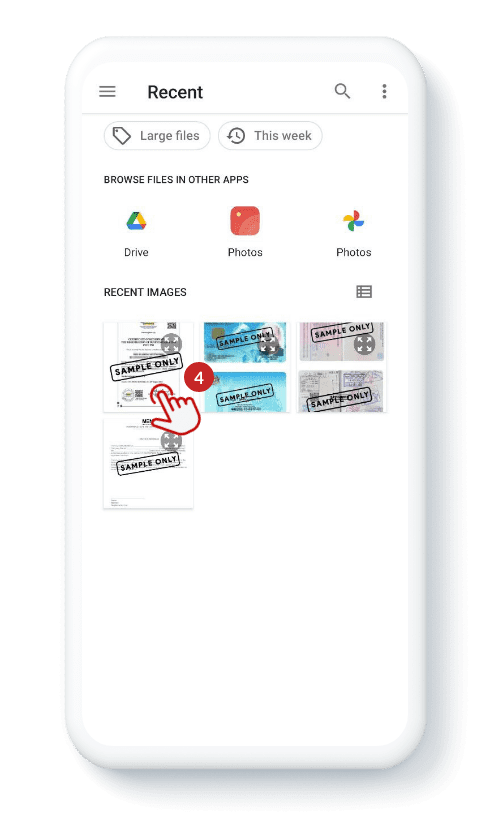
Press “Submit Document” (1) and select “Document type” (2). Upload “Your files from your device’s gallery” (3). After uploading the file, press “Submit” (4). **The rest of the steps are the same operation.
Note: Want to join us but don’t have SSM business files? Don’t worry! You can still join us without an SSM business file. You can request a **”Letter of Authorization” from our Customer Service Department.
Documents that need to be provided are:
NRIC or Passport
NRIC for Malaysia applicants requires; front and back
Passport for foreigner applicants requires; Data page and Visa page


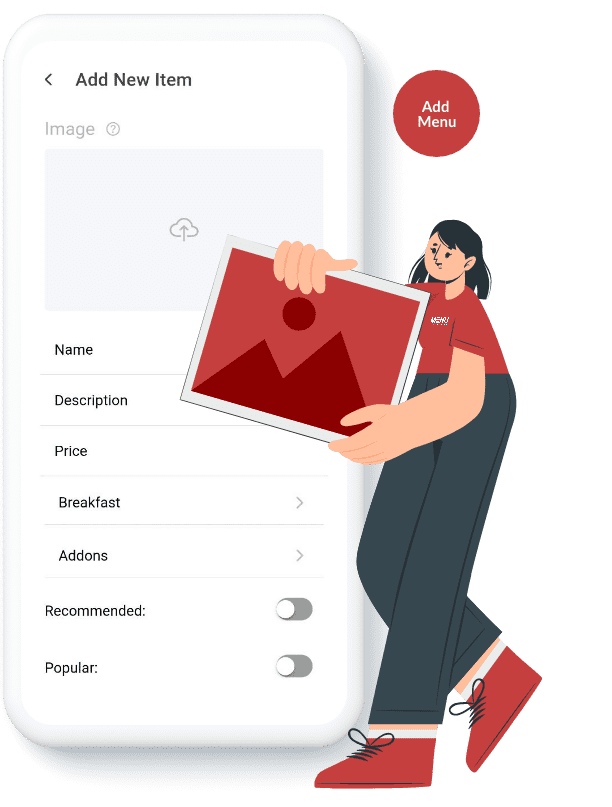
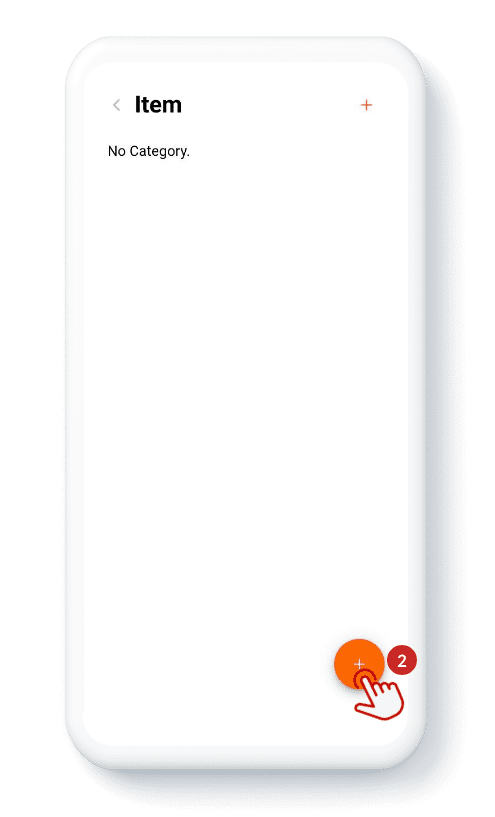
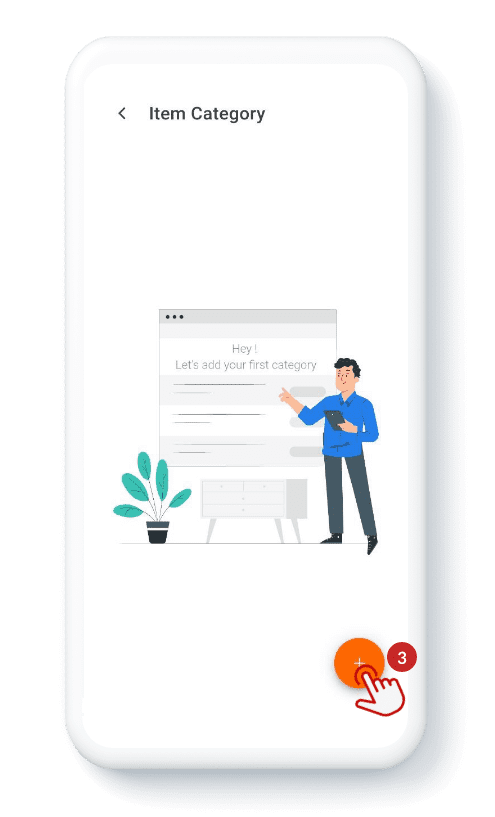
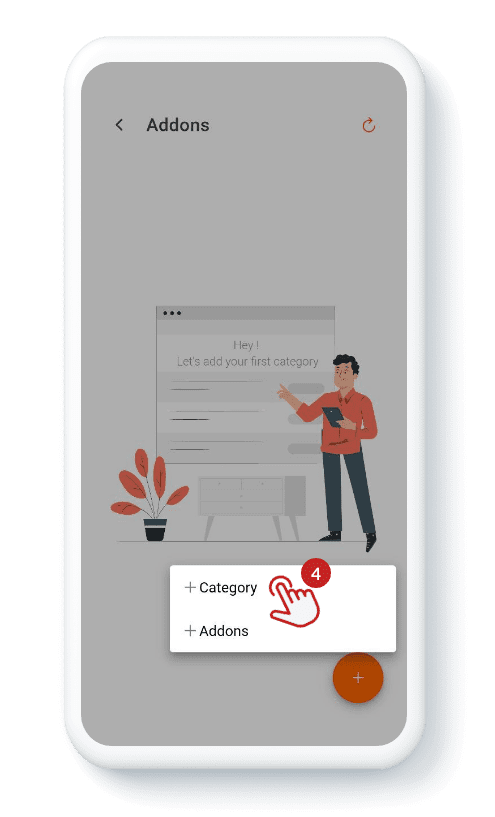
Add Menu
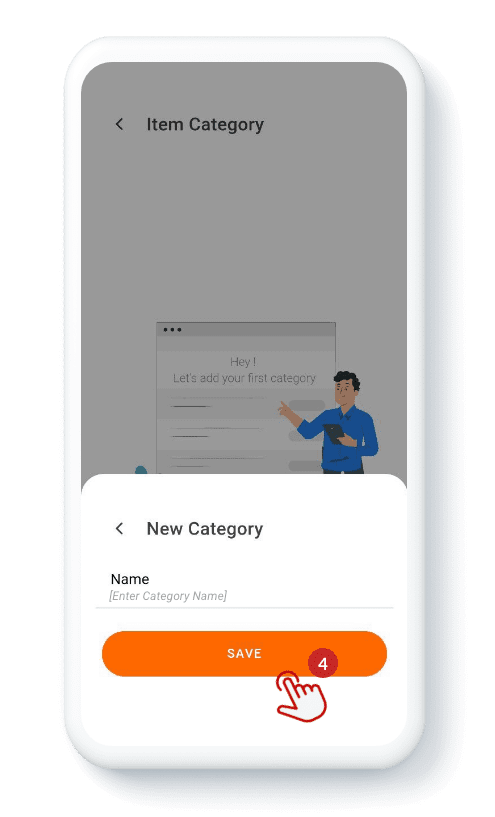
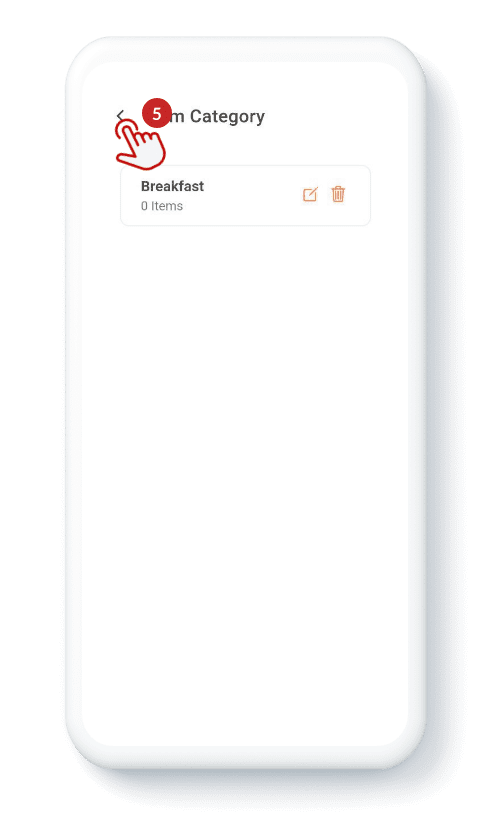
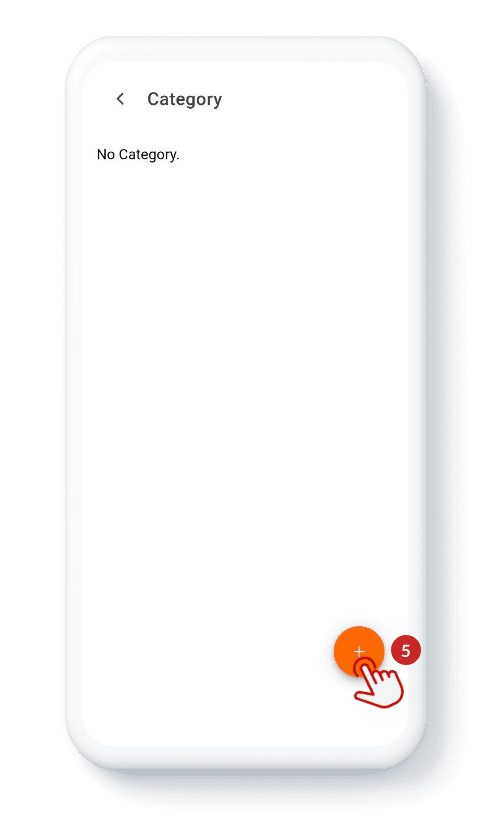
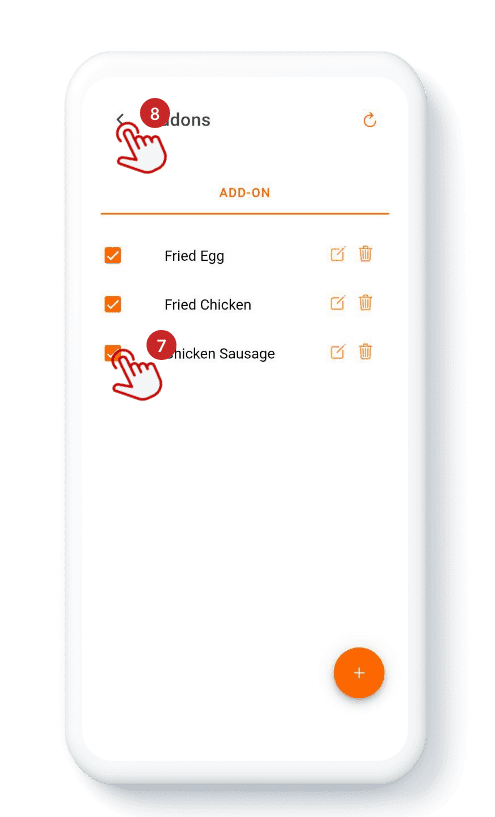
Step 1: Press “Add Menu”(1) and, press “ ⊕ ” (2) to add the item and create a*“New Category” (3) by filling in “Category Name”(4). After filling the category name, press “<” (5) back to the item page.
*Category: It is a group of items, e.g; appetizers, mains, side dishes, and drinks shown on the menu page.
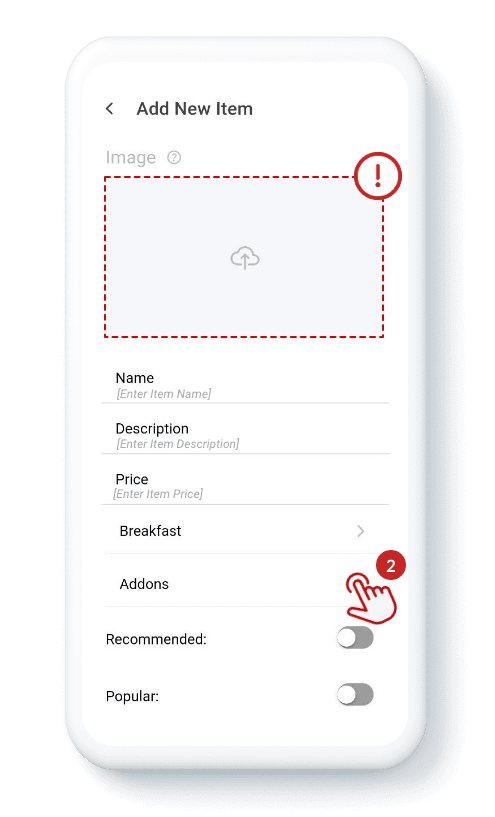
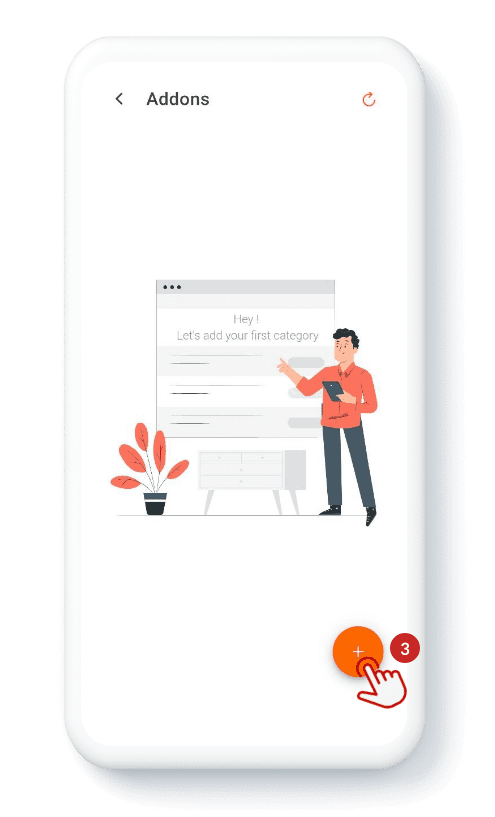
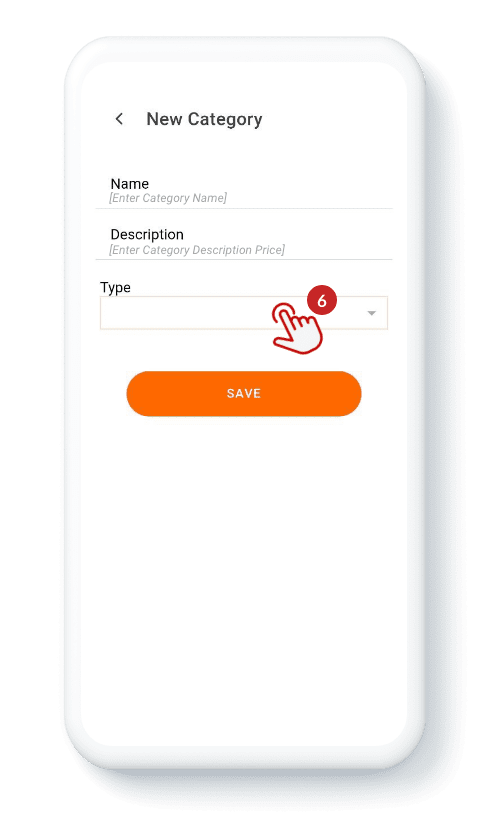
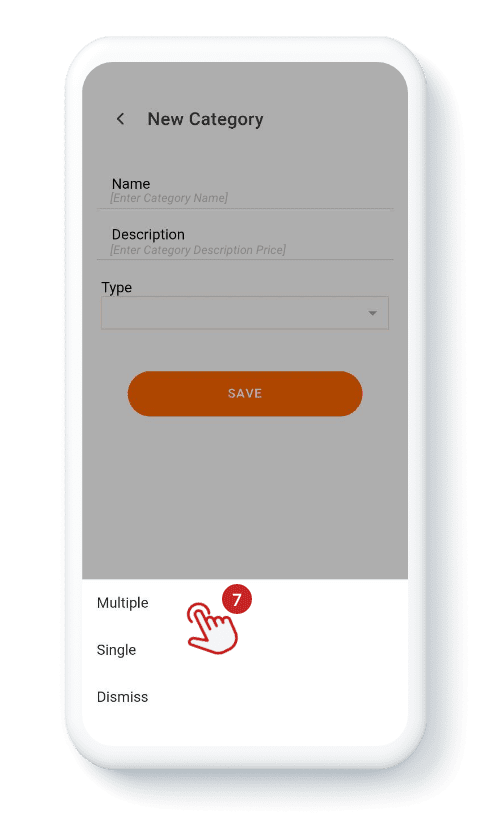
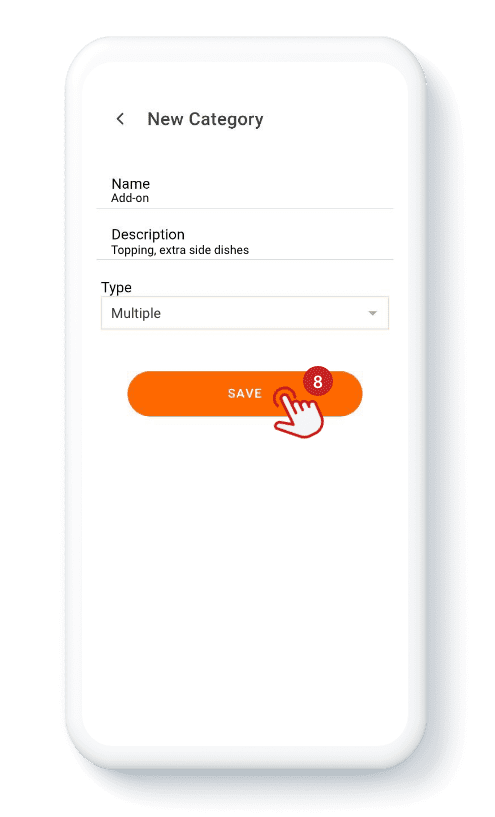
Step 2: Press “ ⊕ ” (1) to add an item, *upload the item image with fill-in mandatory fields (item name, description, price), and press “Addons” (2). After that, press the “ ⊕ ” (3) to add *“Category” (4) and click the “ ⊕ ” (5) to fill in mandatory fields (category name, description), and click the“Category Type” (6) to select category type*“Multiple or Single” (7). Please press “Save” (8) the detail of the category and press “<” (9) back to the Addons section.
·Upload the Item Image: Customers are more likely to choose dishes that are visually appealing. If your item doesn’t need an addons option you can ignore it and continues to the next step (active item status).
·*Category: It is a group of add-ons e.g; size choice, sauce choice, ice level, topping, etc.
*Multiple or Single: Multiple; maximum choice for customers like topping and side dishes. Single; minimum choice for customers like size and type.
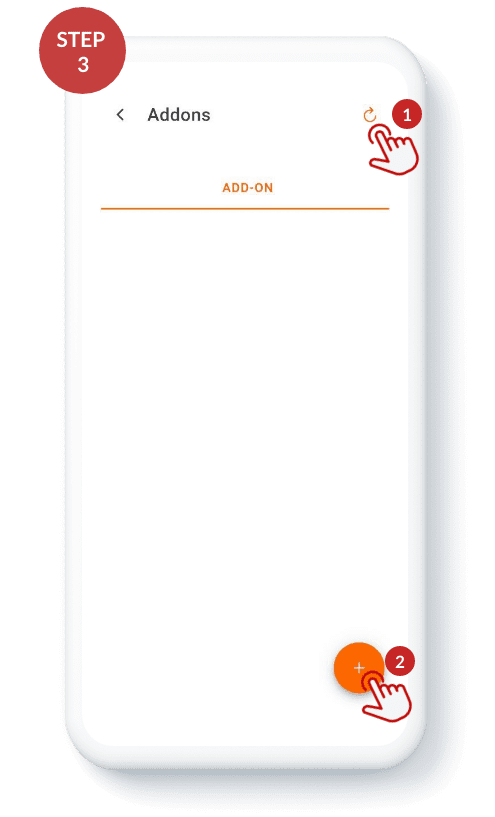
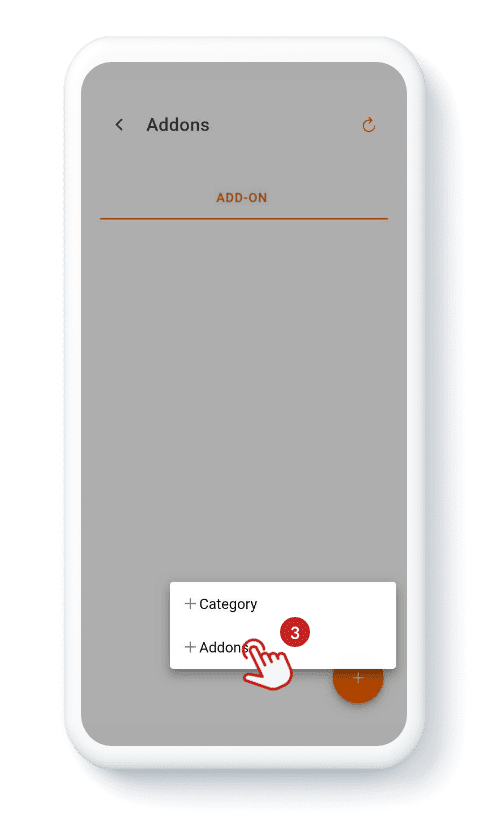
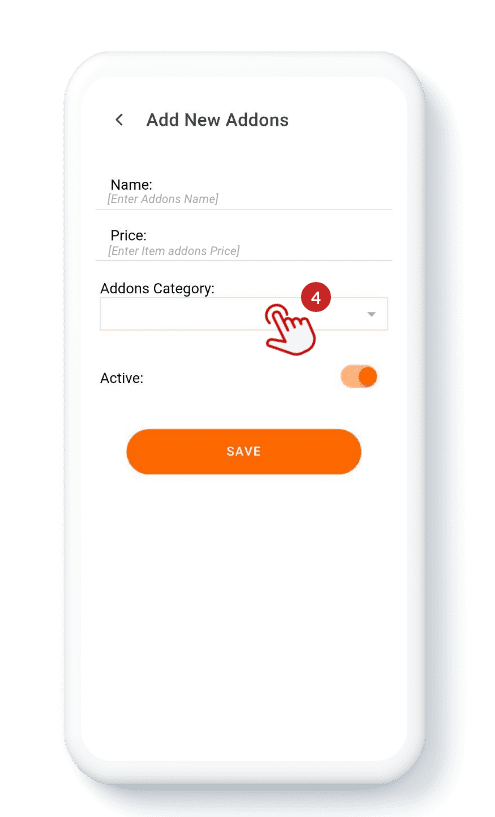
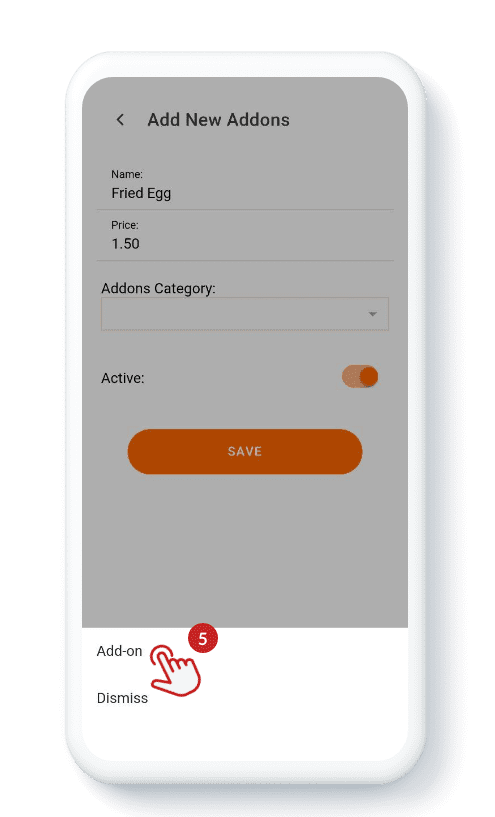
Step 3: PLEASE click the “Reload icon” (1) to refresh the page before pressing “ ⊕ ” (2) and select “ Addons” (3) by filling in the mandatory fields (name, price). After filling do the detail, press “Addons Category” (4) to select the “Category” (5) that you set in the previous step, and then press “Save” (6). Please select the “Option” (7) that you need to display in the addons option, and then press “<” (8) back to the item section.
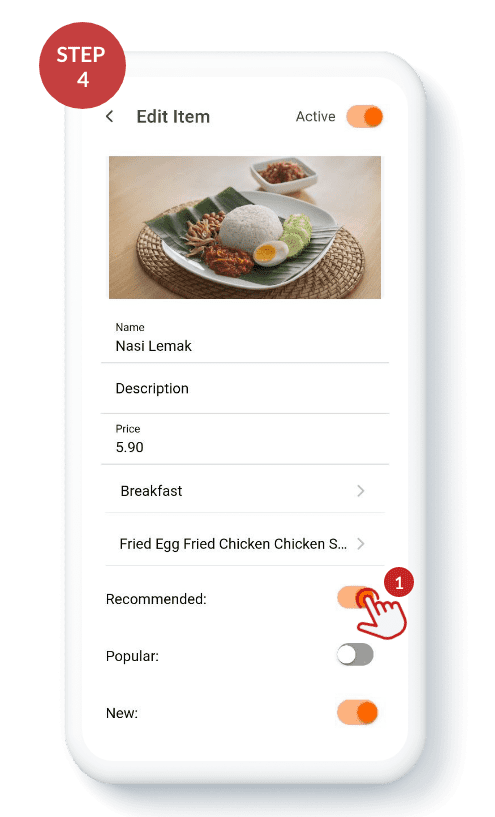
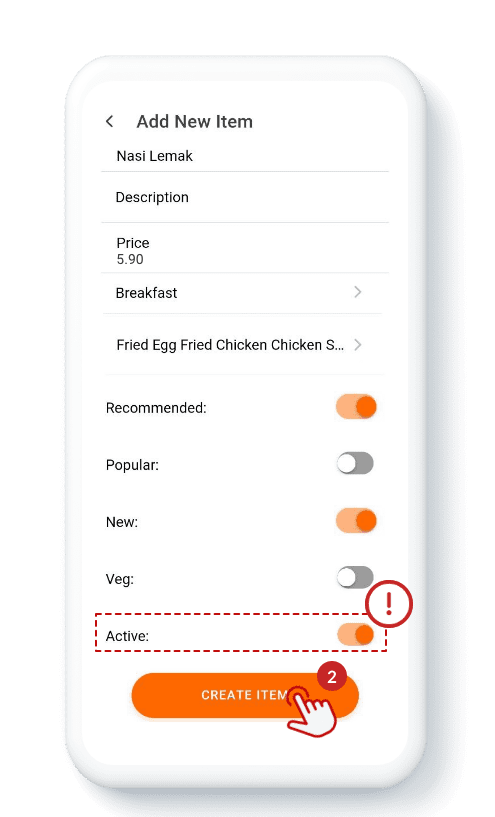
Step 4: Turn on the “Toggle Switch” (1) to active item status (recommended, popular, new, and veg) in your menu according to your item, and press “Create Item” (2)
*Active: Don’t turn off the active button, the active is mean the item will show in your menu. If you don’t sell this item or temporarily sell, sold out, or stock out, you can turn off the button so the item will not show in your menu.


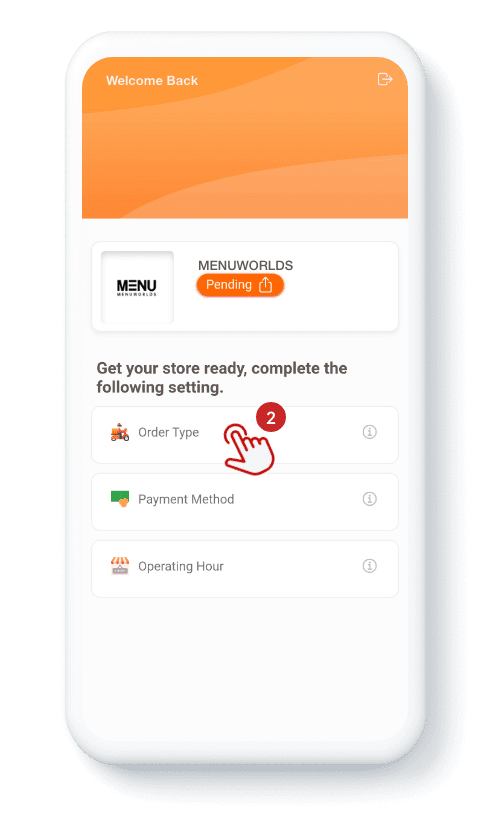


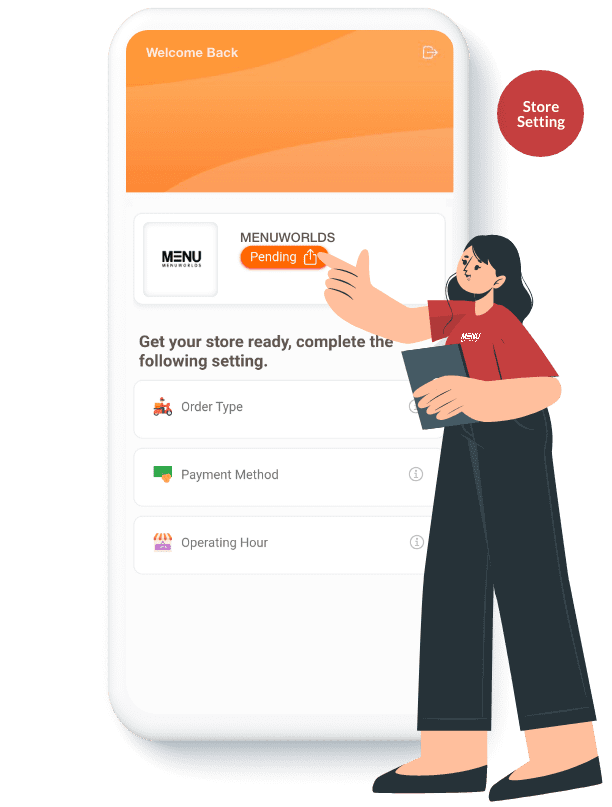
Store Setting
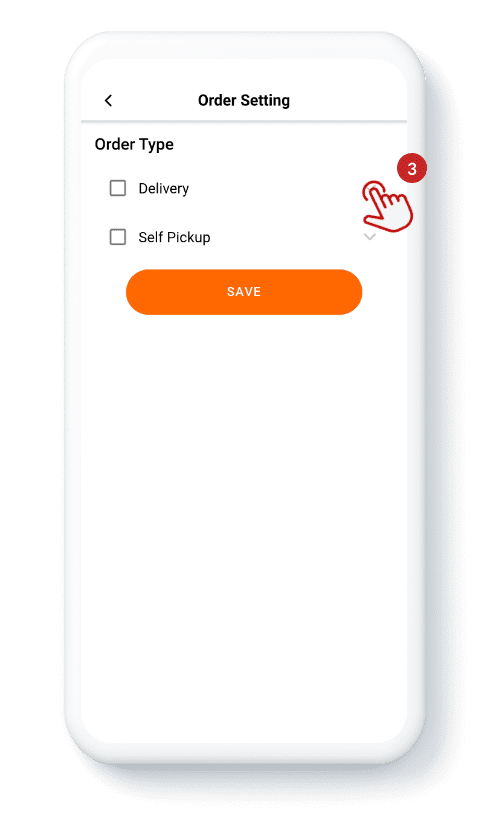
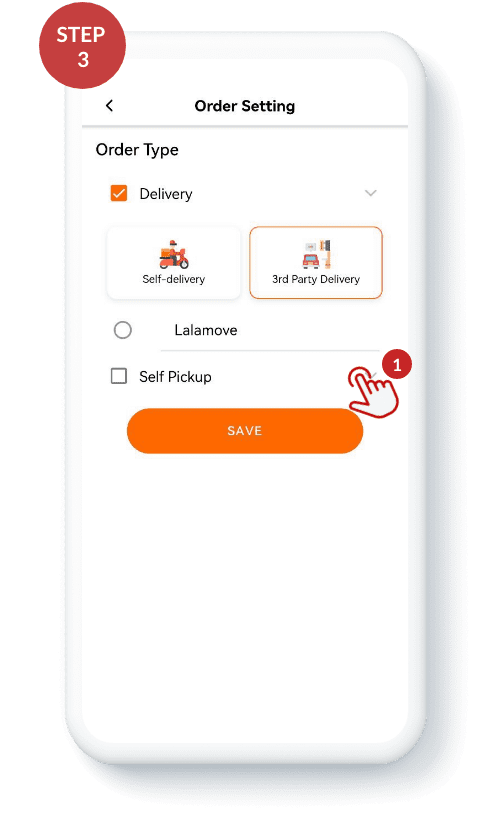
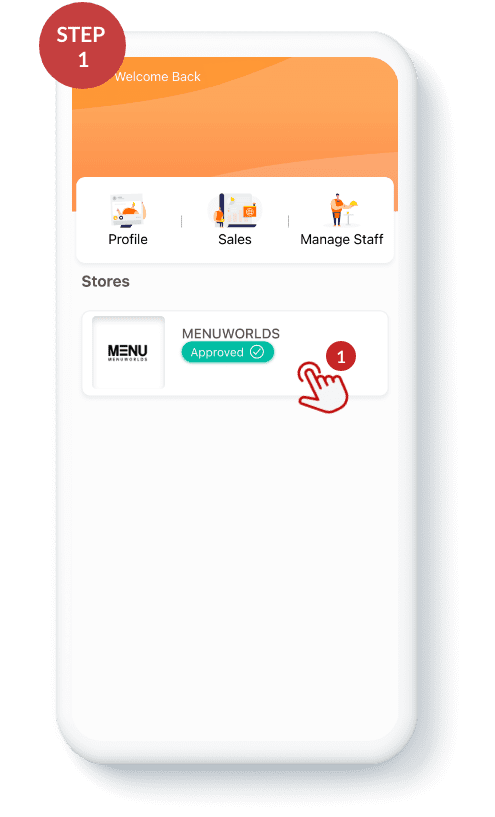
Step 1: Press “Start” (1) to set up your store setting. Press “Order Type” (2) to select “Your Order Type” (3) by 2 options; Delivery (Self-delivery and 3rd party delivery) and Self Pickup.
Step 2: Fill in the detail for the order type by the situation;
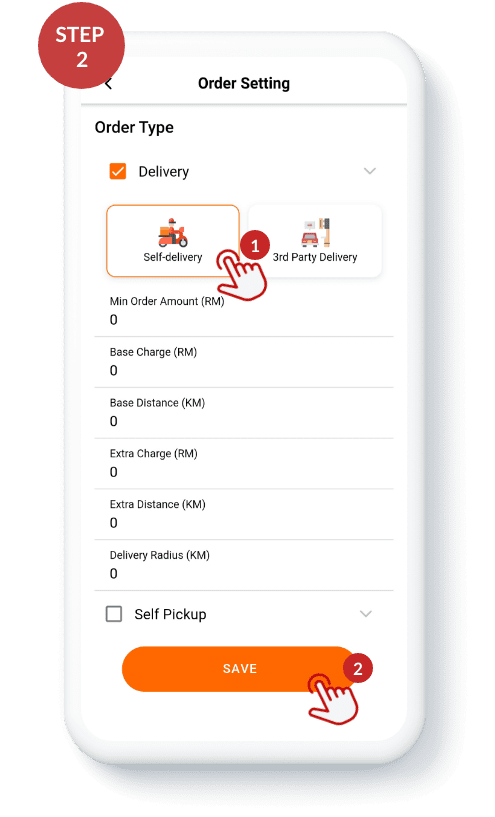
Situation 1: If you want self-delivery, please press the “Self-Delivery” (1) and fill in the mandatory fields (min order amount, base change, base distance, extra charge, extra distance, delivery radius), press “Save” (2).
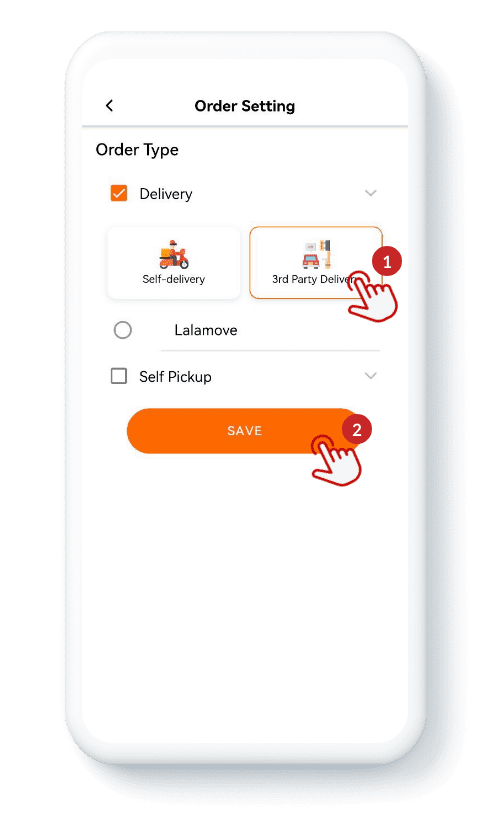
Situation 2: If you need 3rd party delivery to deliver your meal to the customer, please press “3rd Party Delivery” (1) select “Lalamove” and press “Save” (2)
Step 3: Press the “Self-Pickup” (1) fill in the mandatory fields (order charge amount, min order amount), and press “Save” (2).
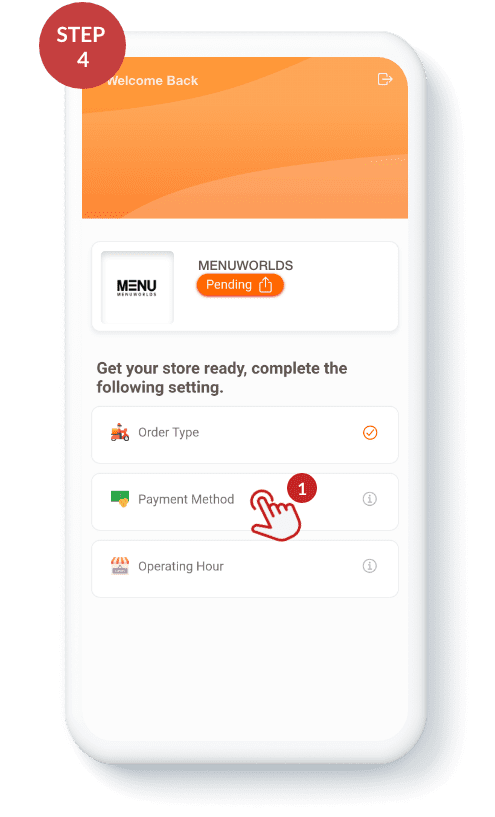
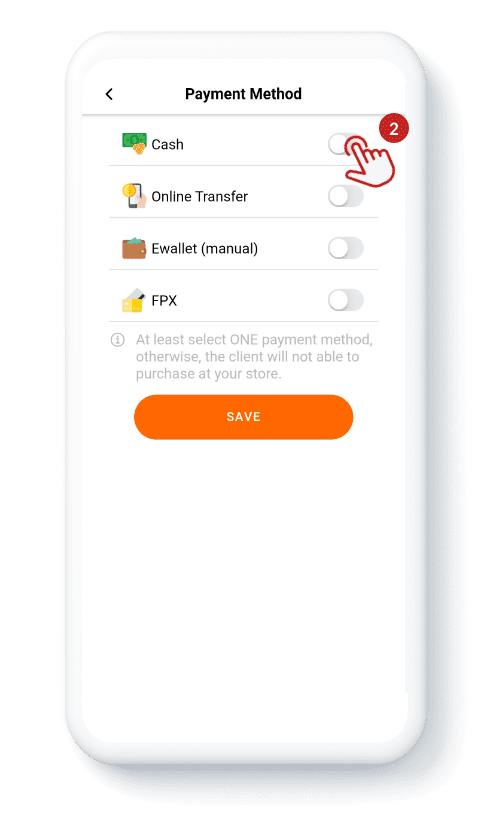
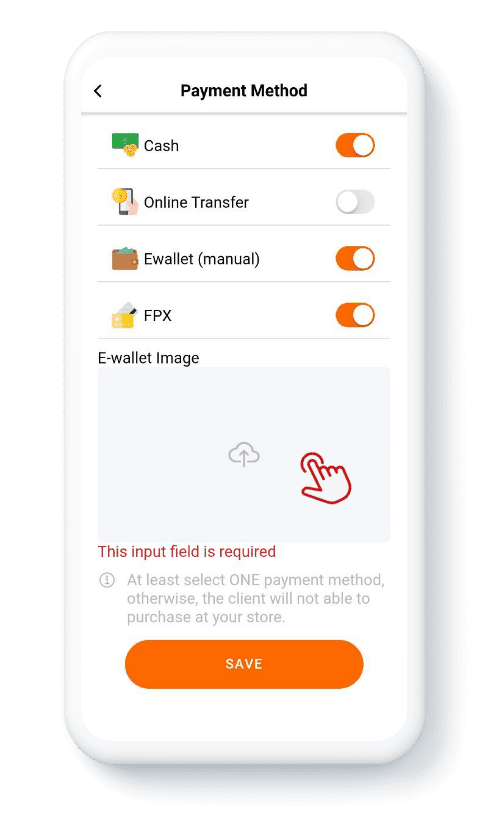
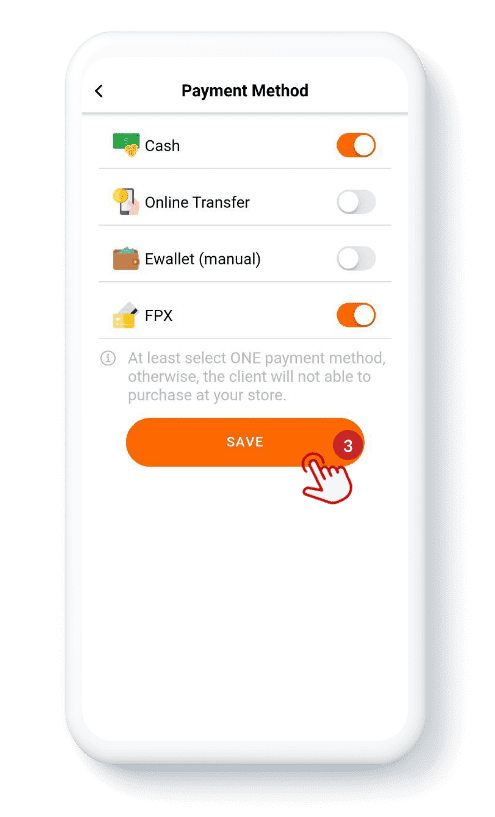
Step 4: Press “Payment Method” (1) to choose “Your Payment Type” (2); cash, online transfer, Ewallet, FPX. After you fill the mandatory fields, please press “ Save” (3).
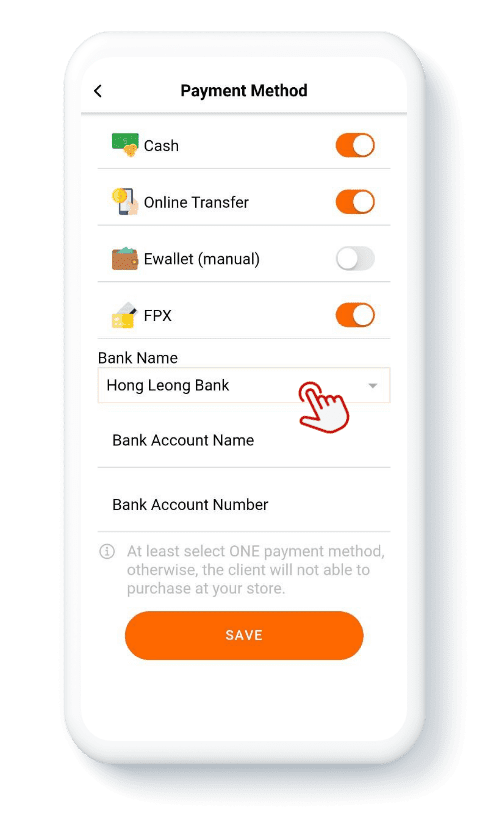
Situation 1: If you choose the “Online Transfer”, you need to fill in (your bank, bank account name, bank account number).
Situation 2: By the way, if you choose the “Ewallet”, you need to upload your Ewallet QR.
Remind: At least select ONE payment method, otherwise, the client will not able to purchase at your store.
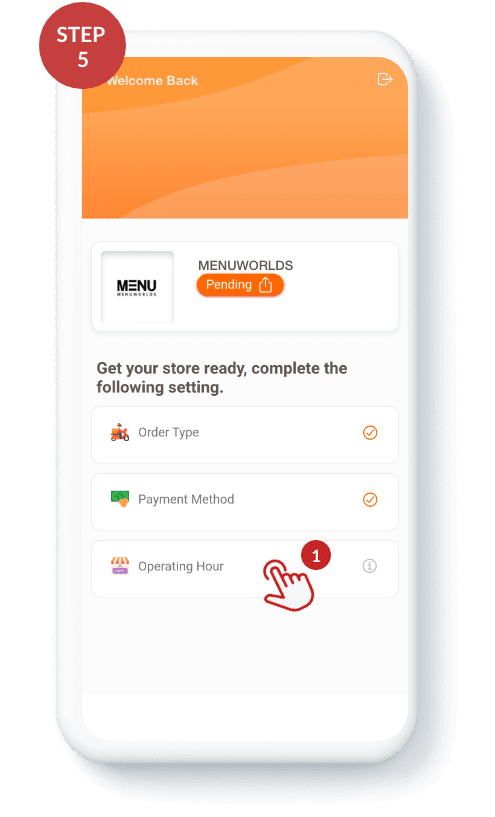
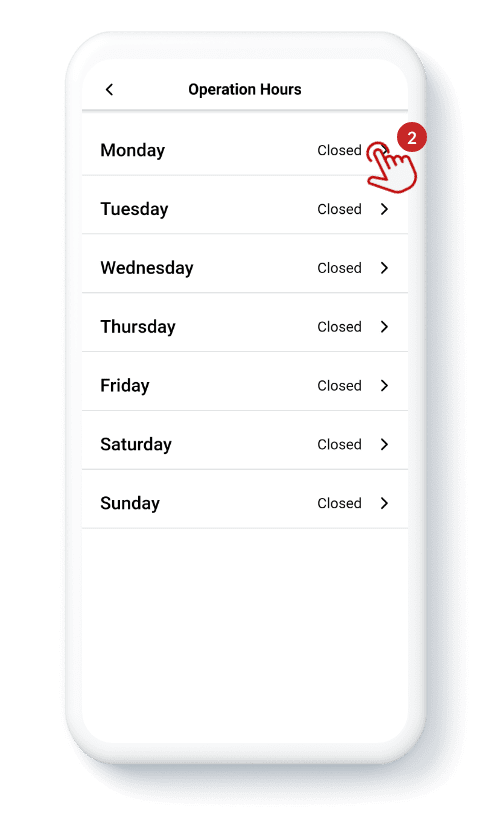
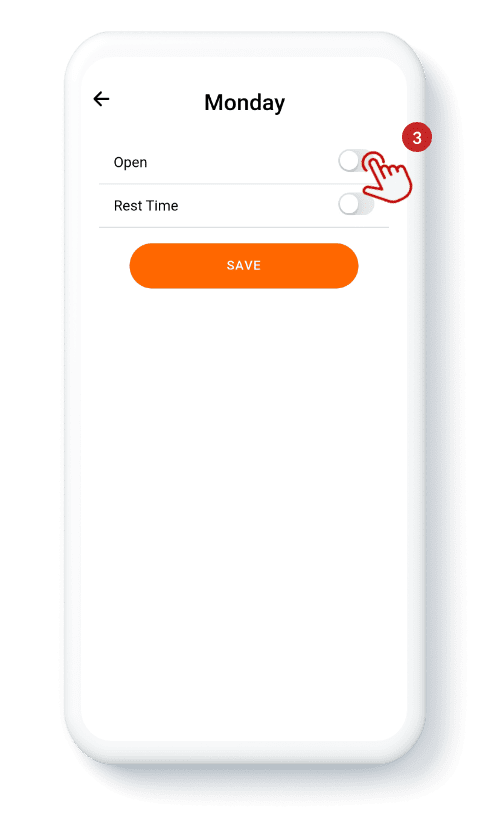
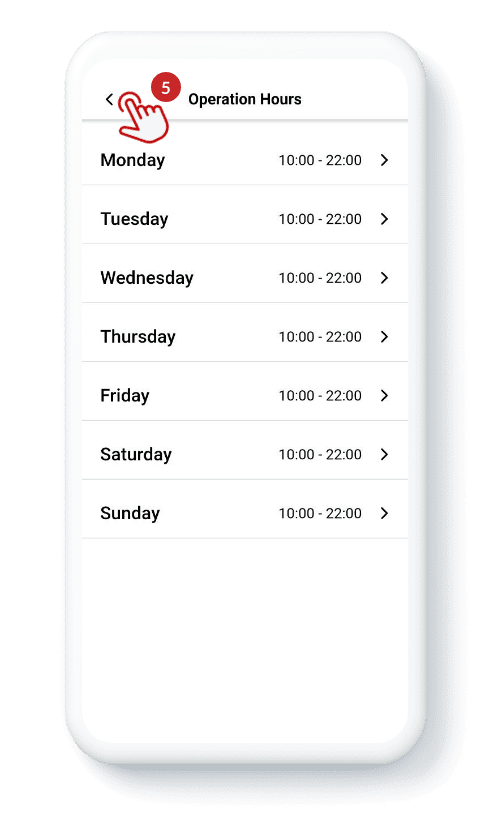
Step 5: Press “Operating Hour” (1) and set “Your store operating hours” (2) by day. You can press “Open Time and Rest Time” (3) to set up the time depending on your store nature and press “Save” (4). After you finish setting your store operation hours, press “<” (5) back to the home page.
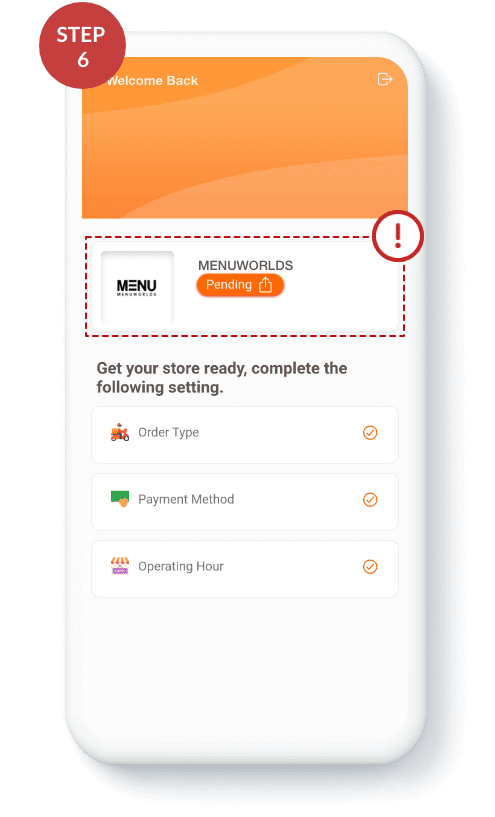
Step 6: After you submit all documents and settings, please contact our MENUWORLDS Customer Service to get the approval to activate your store and start your business.
Welcome to MENUWORLDS Merchant App.
Let’s start your journey with MENUWORLDS now!
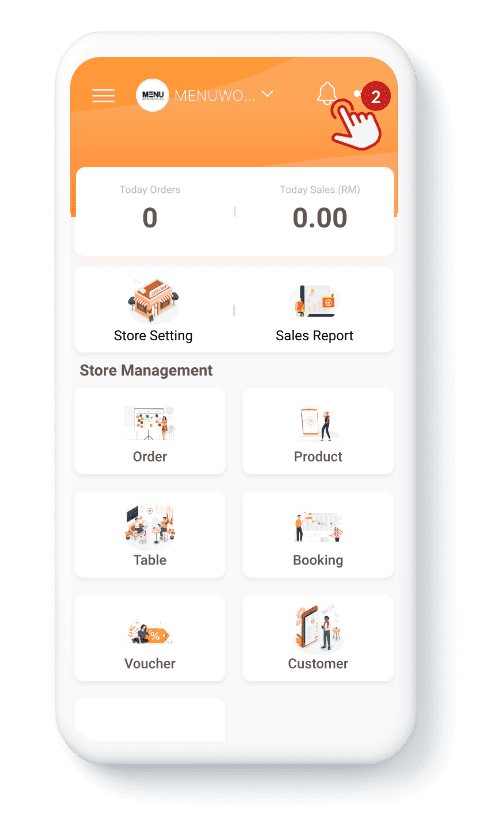
Order
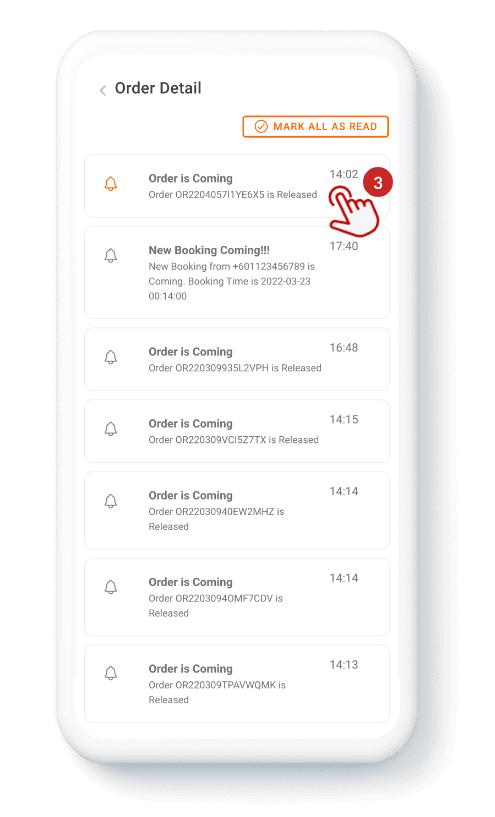
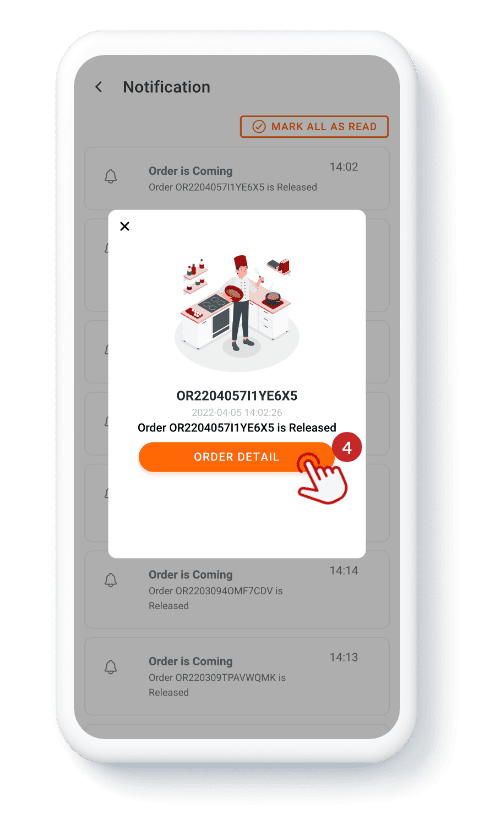
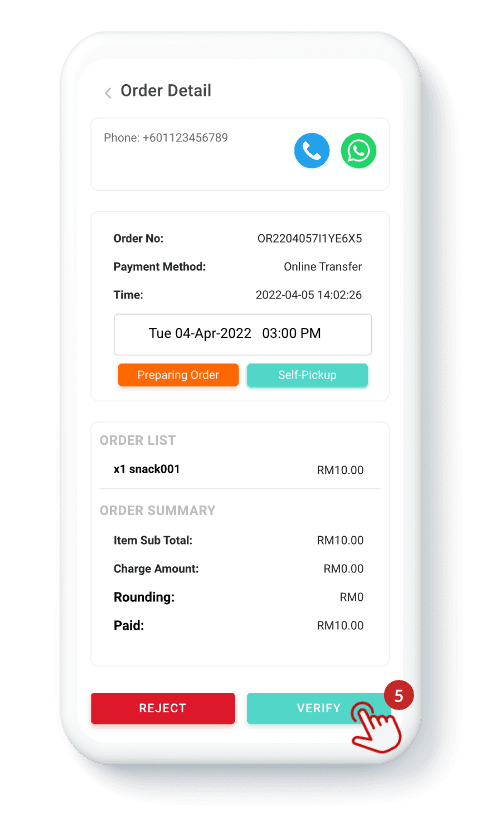
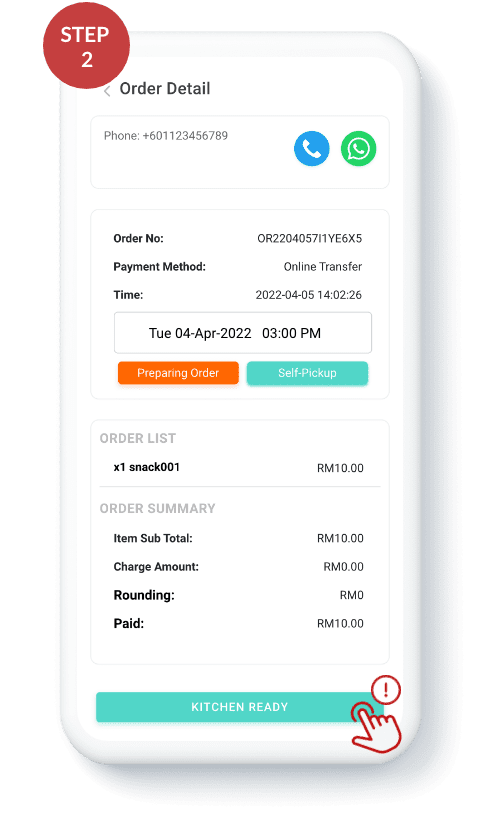
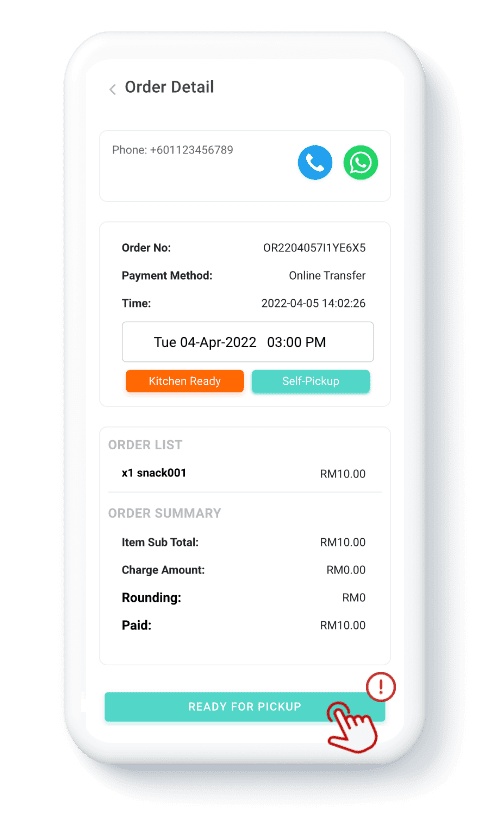
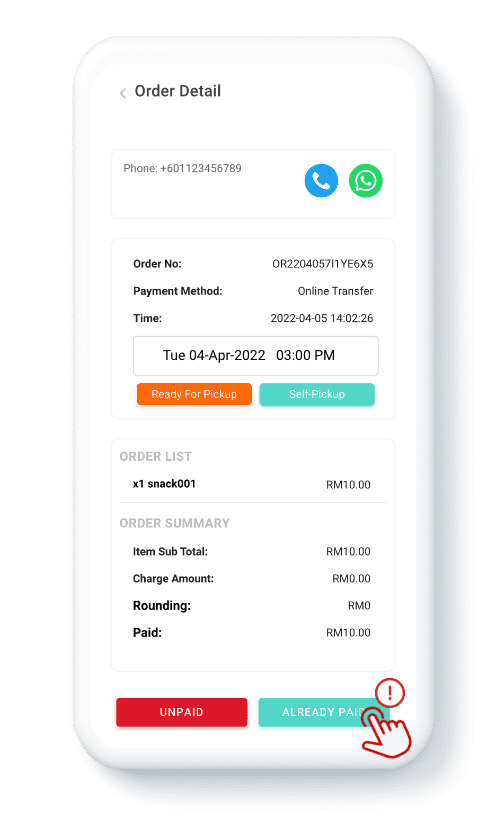
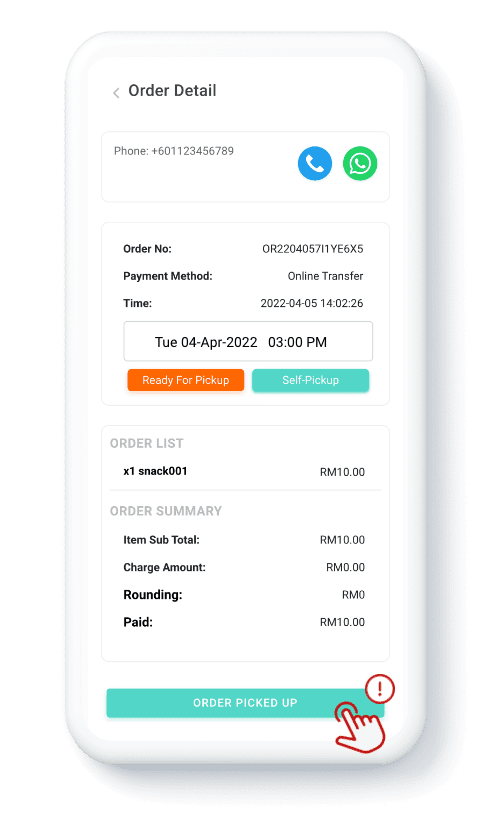
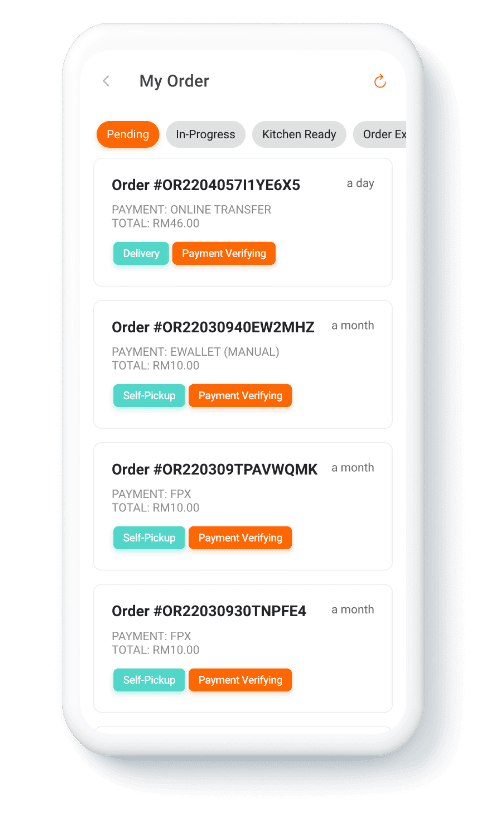
Step 1: Go to the Home Page and press the “Stores” (1) go to the store page. Then, press the “Bell” (2) on the right top of the page to check your order in the notification. The new order will show on the top of the notification, so press the “Order” (3) to look at your “Order Detail” (4). Please press “Verify” (5) to confirm the client’s order within 5 minutes. Otherwise, the system will auto cancel/refund the order.
Step 2: When you verify the order, please press the“Order Status” when you finish every step; clients can track the status of their orders:
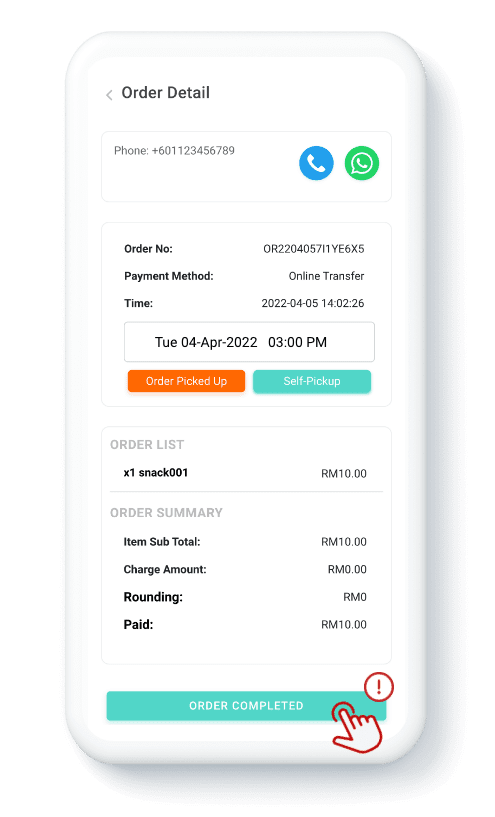
Situation 1: “Delivery status”; Kitchen Ready, Ready for Pickup, Order Picked Up, Order Delivering, Order Delivered, Order Complete
Situation 2: “Self-pickup”; Kitchen Ready, Ready for Pickup, Order Picked Up, Order Delivering
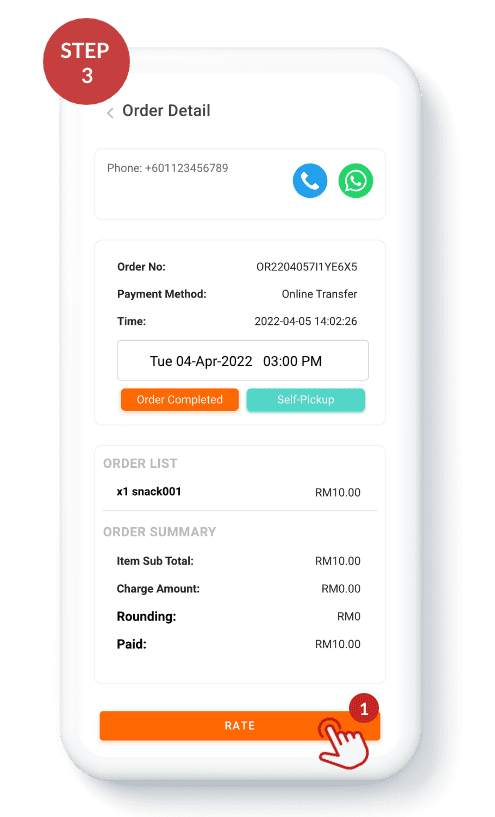
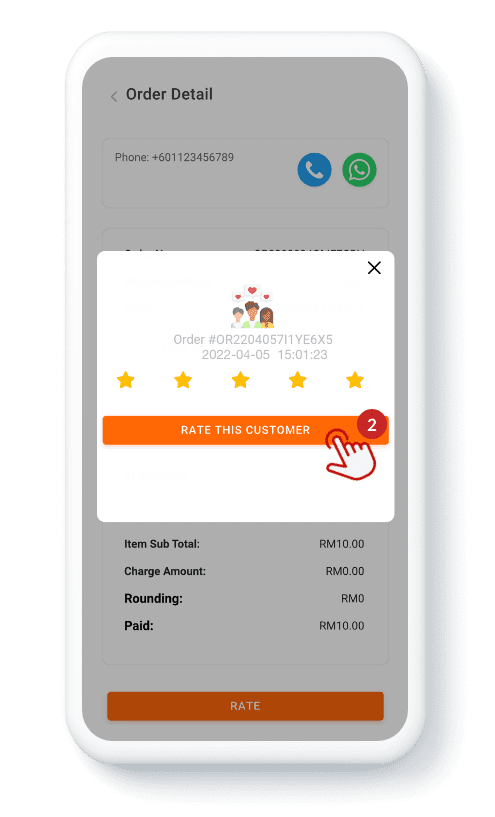
Step 3: After completing your order, you can give your client a review, so you can press “Rate”(1) give the star, and press “Rate this customer” (2).
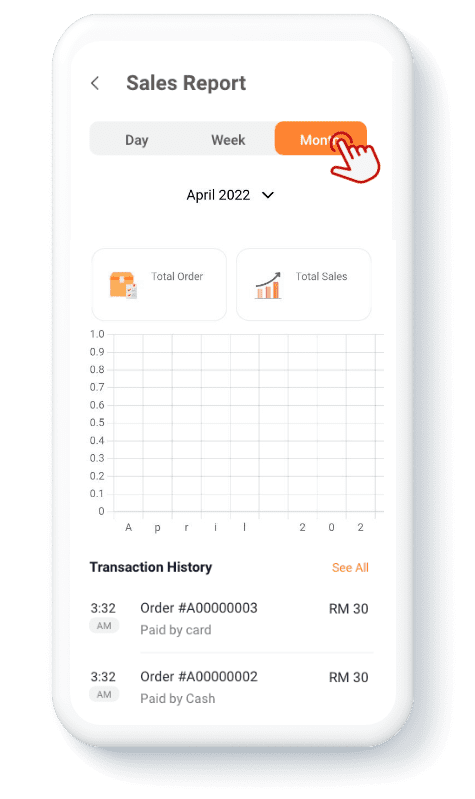
Sales Report
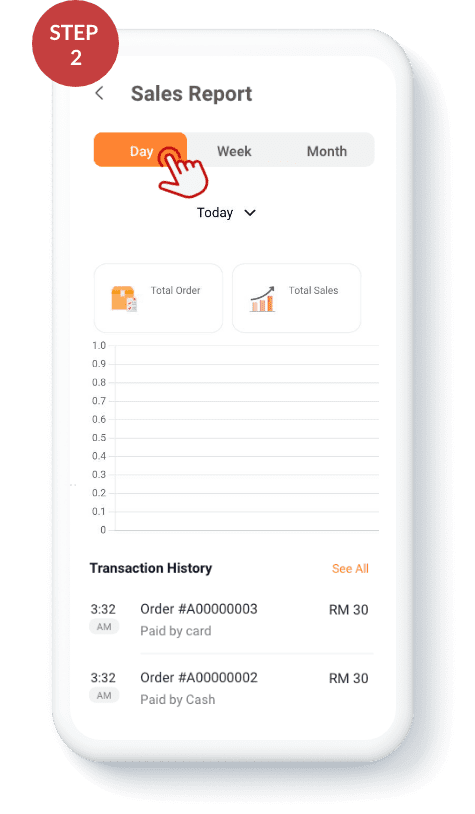
There have 2 places that can be pressed to see your sales report. One, press “Sales” (1) on the store page. Two, press the “Sales Report” (2) on the home page.
Tips: In the “Sales Report”, you can check your store sales by day, week, and monthly. Other than that, you also can check the transaction history and top sales items.


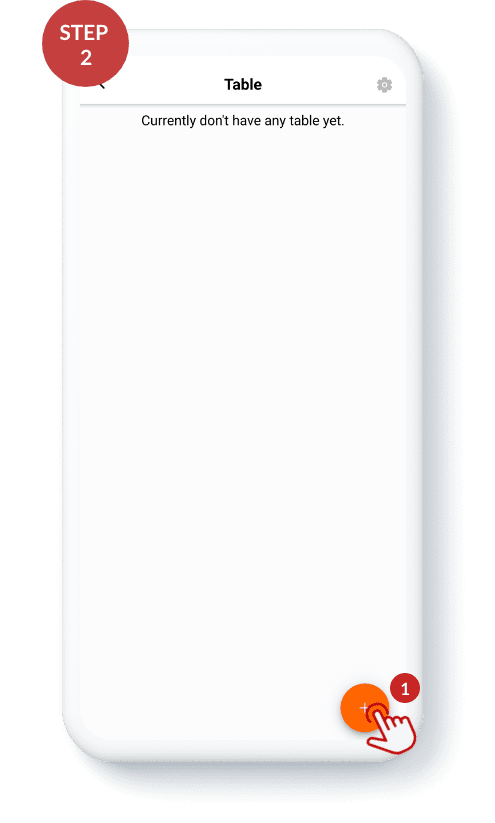
Table
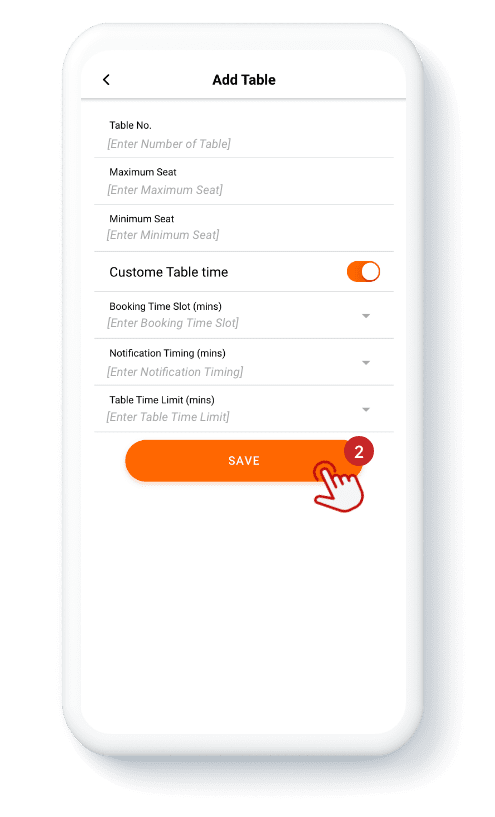
Step 1: Go to Home and press the “Stores” (1). Then press the “Table” (2). and press “⊕” (3) to create the table and set your store’s table setting (Table Number, Maximum Seat, Minimum Seat, Custome Table Time; Booking Time Slot, Notification Timing, Table Time) and press “Save” (4).
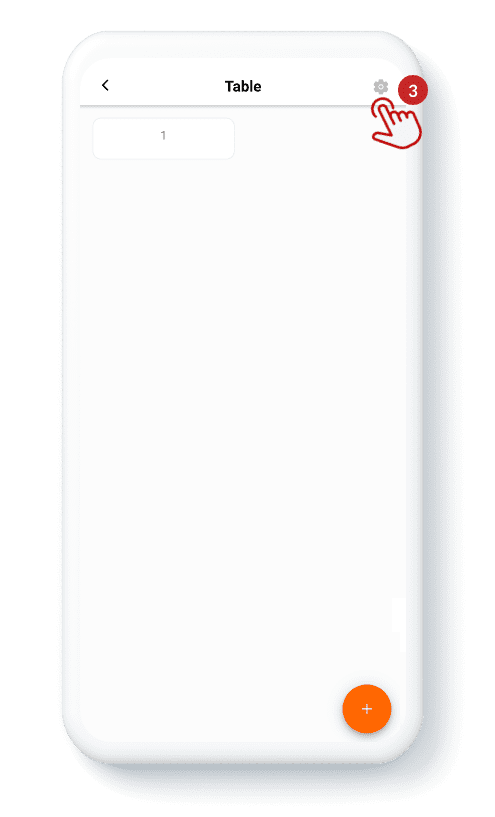
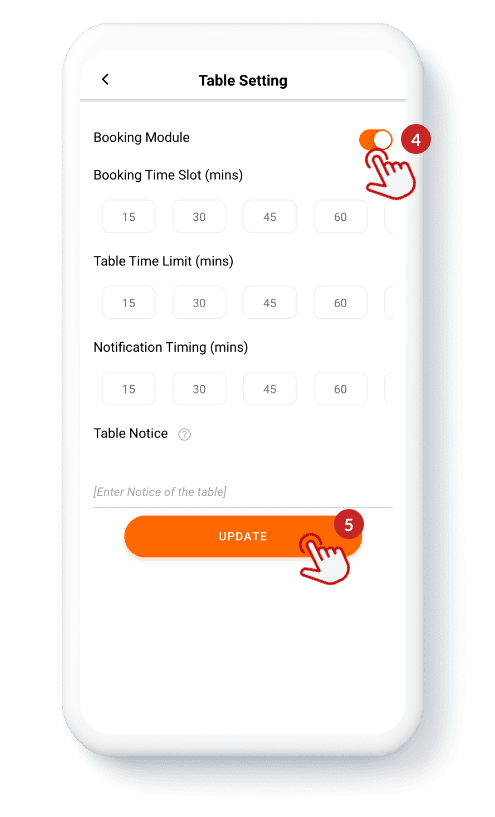
Step 2: Press “Setting” (1) to set the table setting, press “Toggle Switch” (2) to active the booking module to set your store table setting, and last press “Update” (3).
Booking
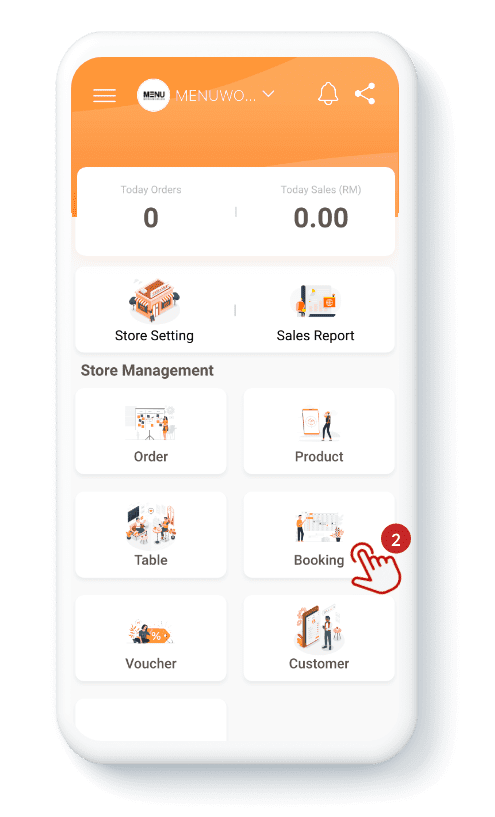
Step 1: Go to Home and press the “Stores” (1). And then press the “Booking” (2).
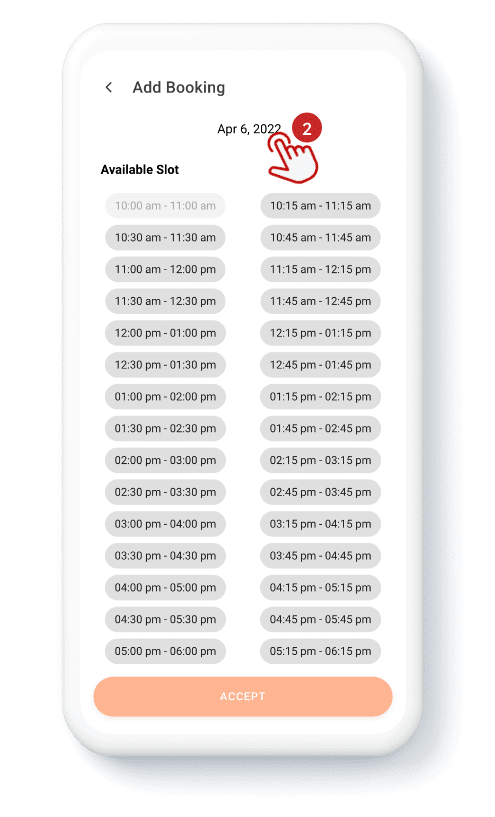
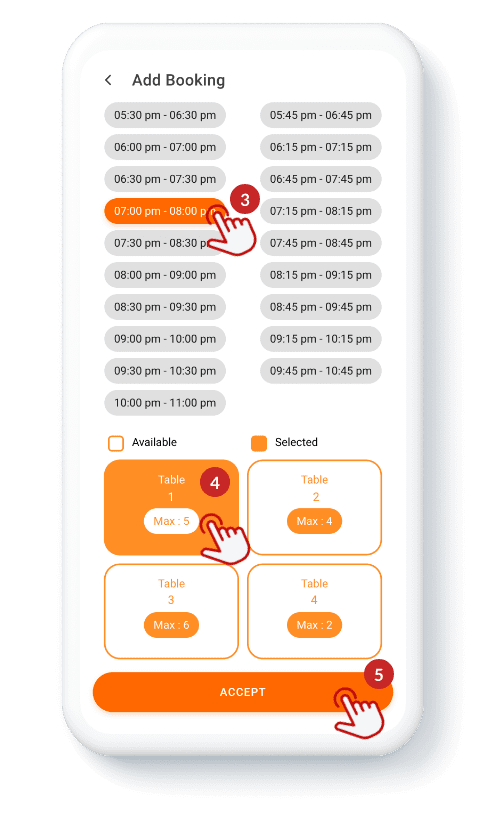
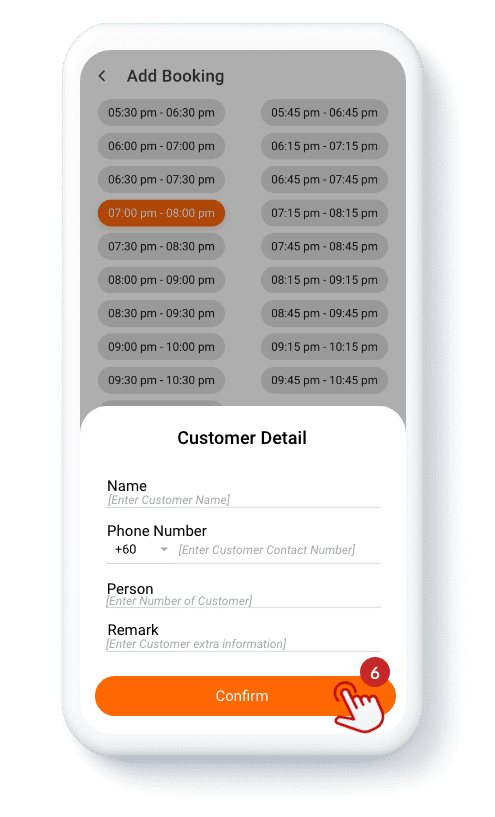
Step 2: You can help your client book when they call you to reserve, you can press the “ ⊕ ”(1) and press “Date” (2) that customer prefers time to come to your store to enjoy the meal. Select or choose the “Time” (3), select the “Table” (4) according to the number of customers, and press “Accept” (5). Then, fill in the client detail and press “Confirm” (6).
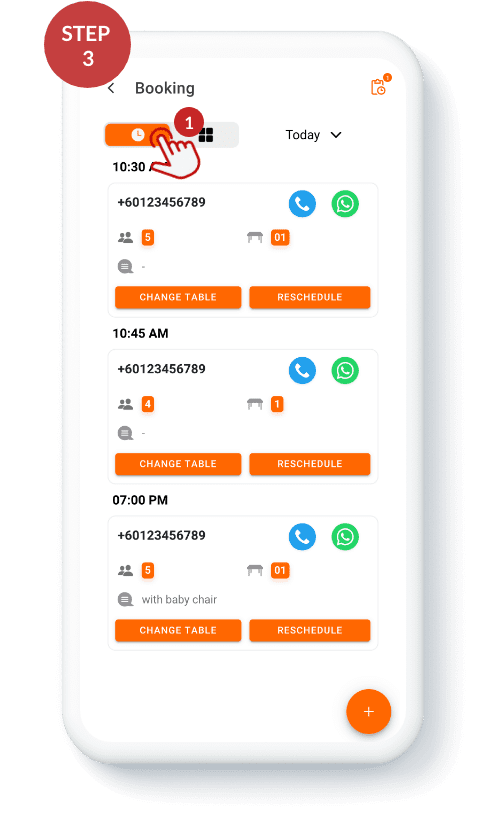
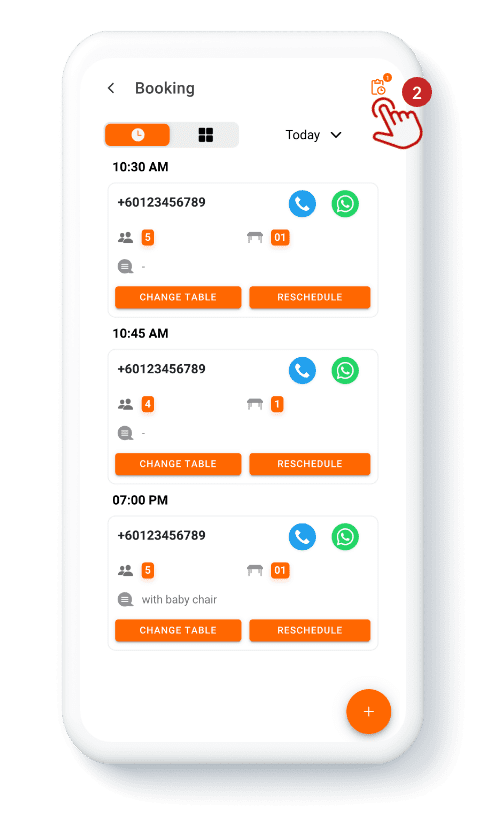
Step 3: Press “ Time” (1) to check the detail and prepare the table before customer arrival. If your customers need to change the booking, you can edit it (change table or reschedule). Other than that, press “Pending Request” (2) to check the request that the customer reserved online in 2 situations:
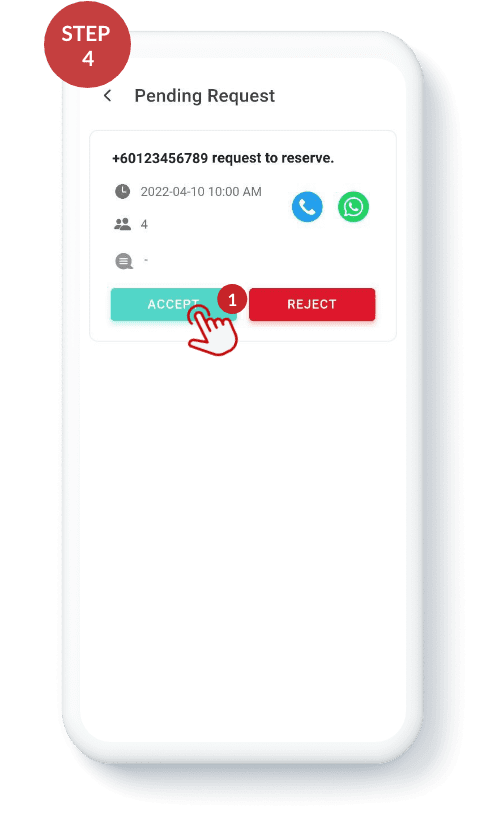
Step 4: Accept or Reject
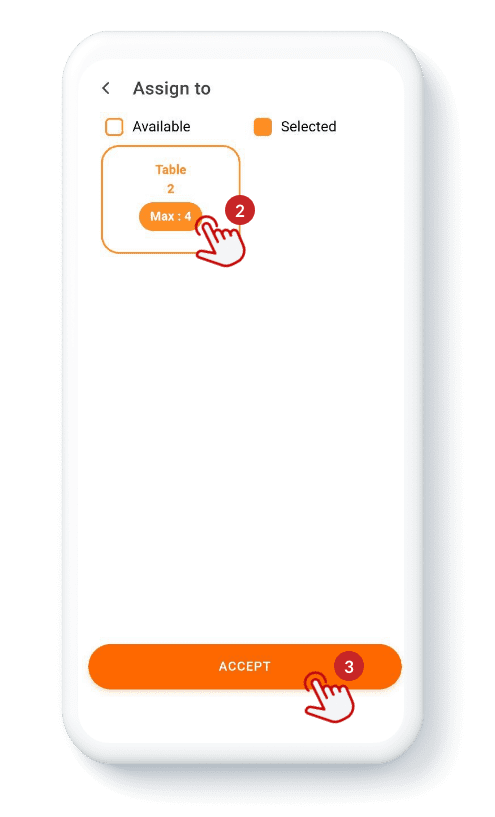
Situation 1: Accept the booking please press “Accept”(1) to “Assign”(2) the customer to a table number that suits their requirement and press “Accept” (3).
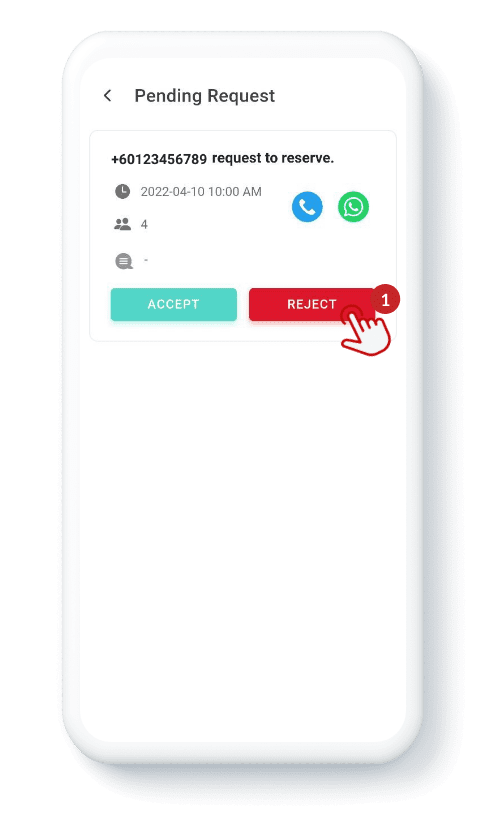
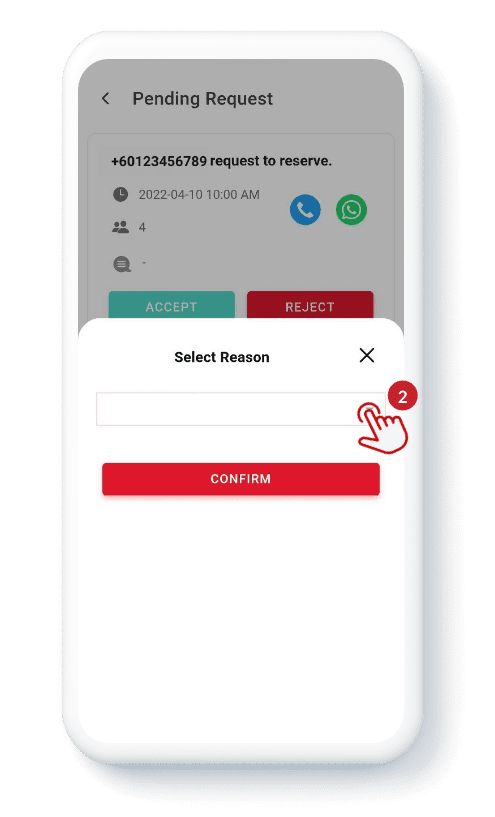
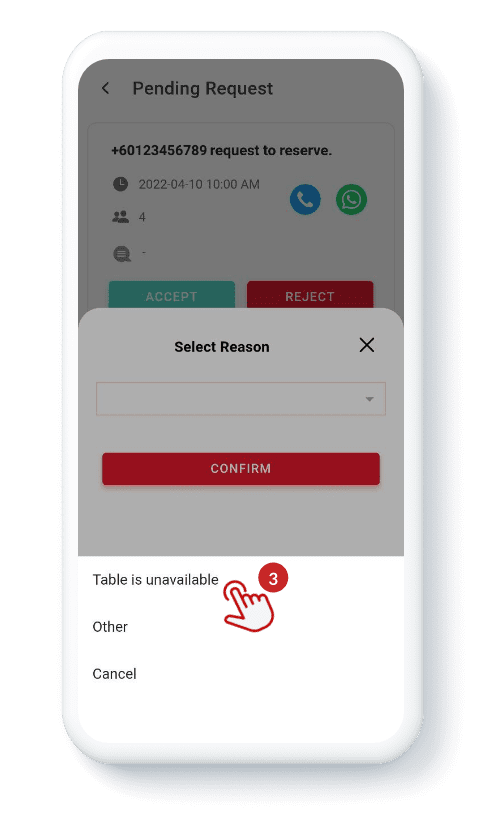
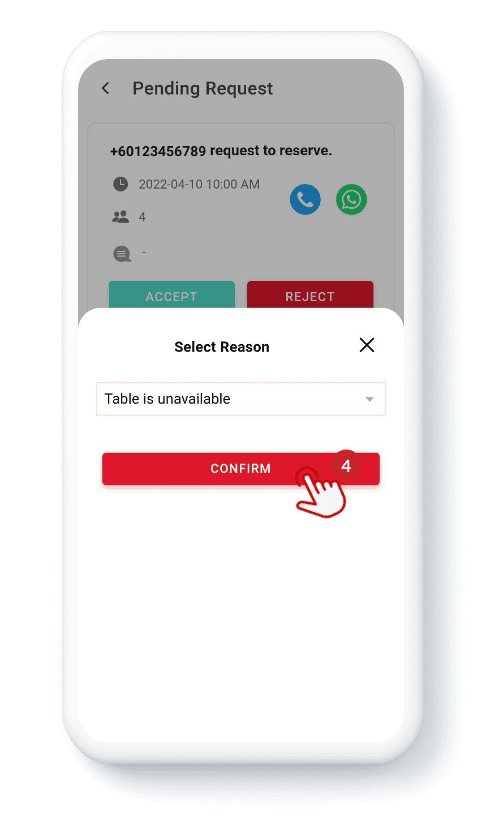
Situation 2: If your shop encounters some unforeseen situation, you are unable to accept the customer’s booking; you can press “Reject” (1), select the “Reason Bar”(2), choose the “Reason” (3) that why you can’t accept the booking to your customers, and press “Confirm” (4)

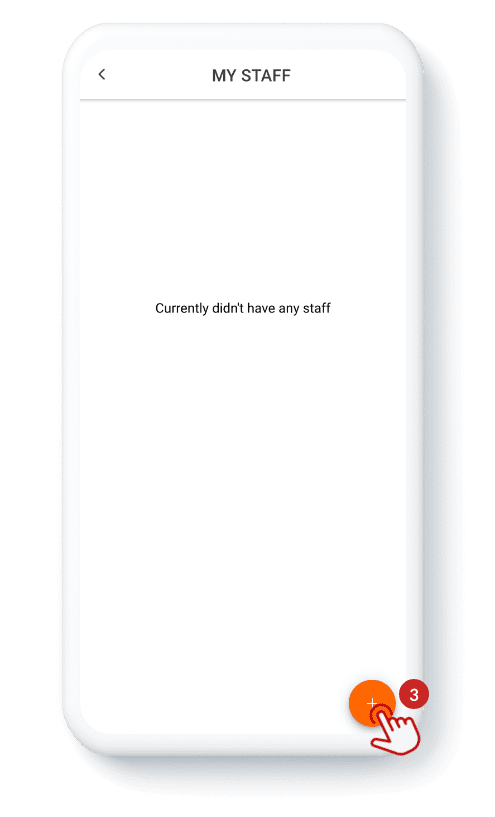

Staff
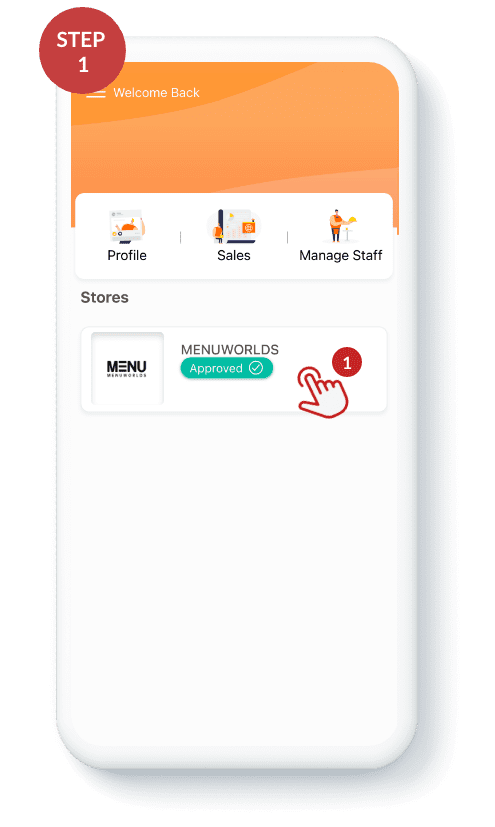
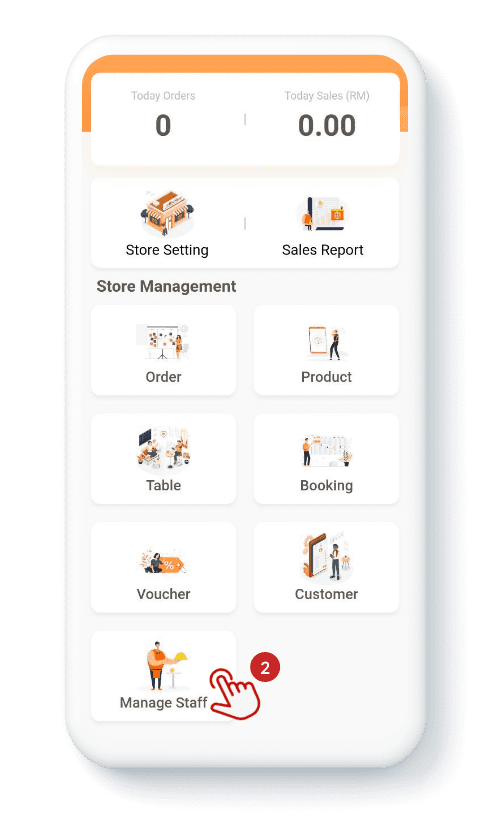
Step 1: Go to the “Home Page” (1) and press “Booking” (2). And then press the “⊕”(3) to add your staff with fill in his/her detail (username, staff name, phone number, staff email, password). After finish filling in his/her detail, please press “Create” (4)
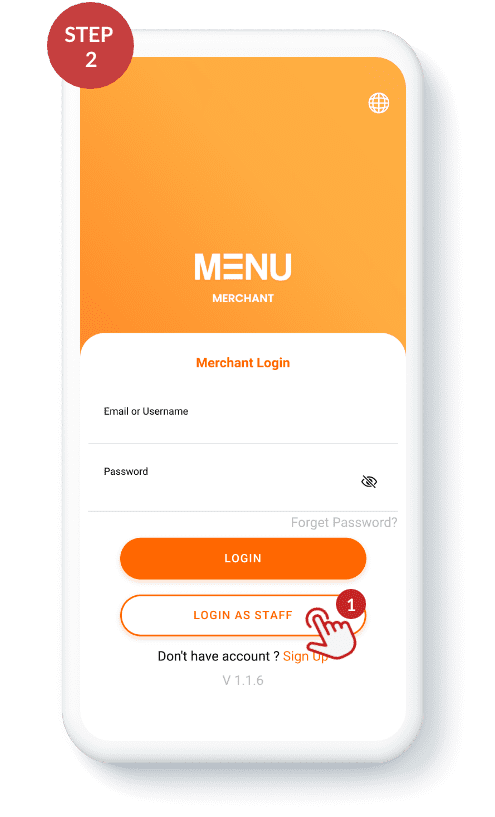
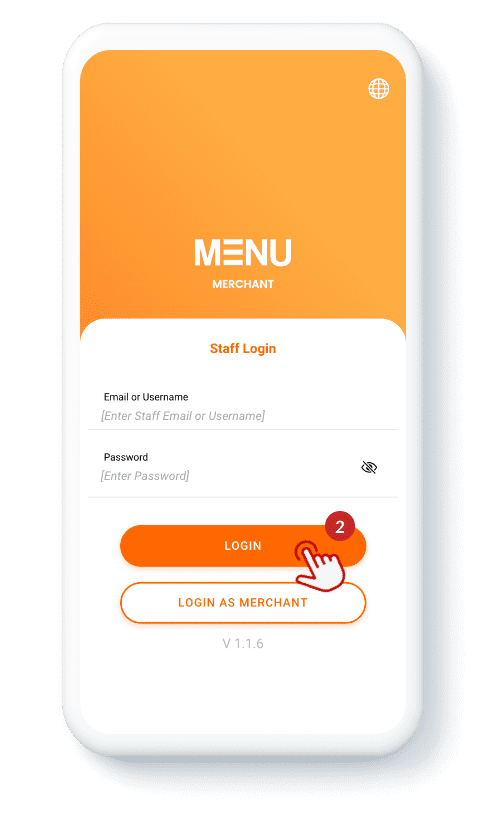
Step 2: Send staff log-in detail to your staff and don’t forget to let them download the MENUWORLDS Merchant APP through their device app store. After finishing the download, open the APP and select “Login as Staff” (1) to enter their email or username and password. Then press “Login” (2), and they will be able to control and process orders through the app.